ENG | Arduino, Getting started
Introduction
Target Audience
Arduino articles are meant to be somewhat concise, if steps are easy. There are plenty of really in-depth resources for beginners. On the other hand, unlike other arduino articles, I want to document all problems I had and focus on troubleshooting.
What is Arduino
Arduino is an open-source electronics platform based on easy-to-use hardware and software. It consists of a microcontroller board and an Integrated Development Environment (IDE) for writing and uploading code. Arduino boards can be programmed to interact with various sensors, actuators, and other electronic components, making them versatile for prototyping and building small projects. Arduino is a development kit for Microcontroller(s), not a computer - it has very limited computing power and memory.
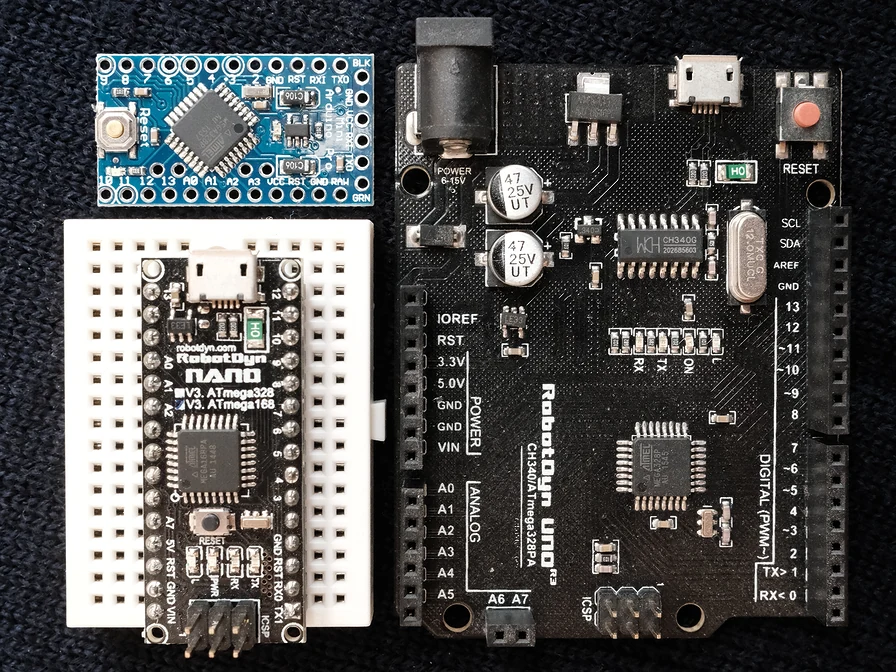 Photo of Arduino Uno, Nano (clones) and Mini
Classic Arduino contains Atmel ATmega 328P microcontoller, voltage regulators providing 5V and 3.3V and USB to Serial interface convertor. GPIO PINs provide I²C, SPI, Serial port, few programmable analog inputs/outputs and few digital inputs/outputs. Some variants have ATmega 168 or lack USB to serial interface, some contain more powerful microcontrollers.
Why to avoid it
Be realistic. Original Arduino costs like 20EUR for 1EUR 8bit microcontroller which is completely outdated in 2024. Clones are priced more reasonably, if you insist of buying relics. Arduino was useful 10 years ago, because it had large ecosystem and easy to use IDE. This features are not unique to Arduino today. It is basically as learning Turbo Pascal in year 2000 because it was used since 80s. And don’t get me started on those shields - perfect for when you want to pay extra for inflexible hardware that you’ll use at most once. Large ecosystem can be disadvantage as every sensor has a library and you won’t learn much by using it - and those libraries are often just few tens lines of code. Relying on libraries for everything makes code unportable to other platforms.
Only use case today might be using Arduino Pro Mini due to very low power consumption as it has no built-in USB to serial converter, inefficient power regulator and LED can be mechanically removed.
For 2020s era, I’ll suggest:
- ESP32 for having BLE/WiFi
- STM32 as more powerful option
- Raspberry Pi Pico - Proof that good hardware can be cheap. Has WiFi/BLE version and good documentation
- nRF52 series - which has BLE and promises low power operation - maybe replacement for last Arduino use case? I’m willing to try this, however it might not be the most user friendly option (later update: quite the opposite 🙁)
In conclusion, while Arduino has its place in history and education, modern alternatives often provide better value and capabilities for contemporary projects. Maybe Arduino is still a valid option for very simple stuff such as color LED strips or using motor shield for driving DC motors where it’s good enough.
Installation and first test
Steps are really easy:
- Download and install Arduino IDE
- Find some working USB cable and connect Arduino
- Warning: LEDs on some Arduino clones are models were scrapped from Death Star lasers 😎
- If Arduino’s serial port does not appear in “Serial ports” or “Other devices”, repeat step 2
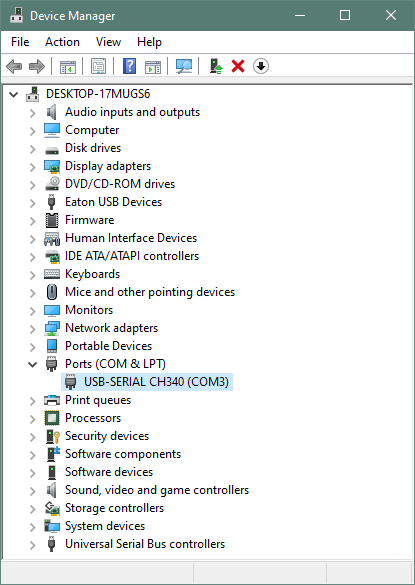
- If it appears under Other devices as Unknown USB2.0-Serial, let Windows find drivers
- Launch Arduino IDE, wait for it to install other stuff
- Do some basic setup
- Select port in Tools->Port (e.g COM3)
- Select Arduino board in Tools -> Board -> Arduino AVR Boards -> Arduino Uno (or whatever you have)
- Test it using one of examples:
- File -> Examples -> 01. Basics -> Blink
- Click on upload icon ➡️ which compiles and uploads program
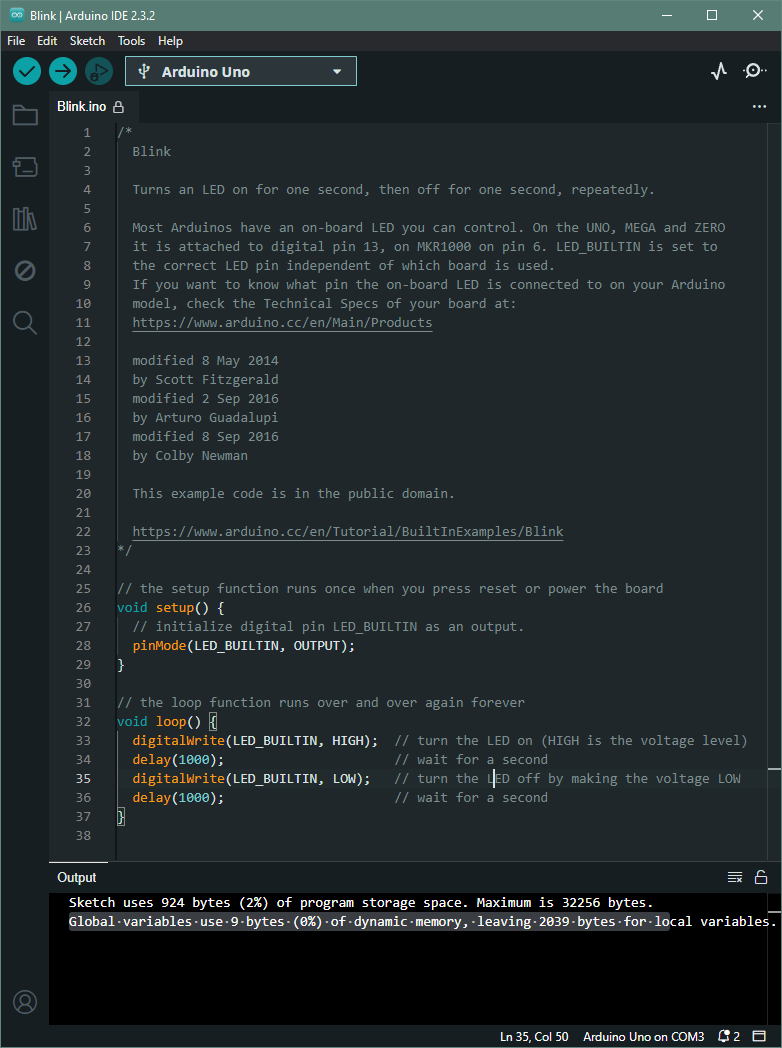
- Enjoy blinking LED or maybe not yet
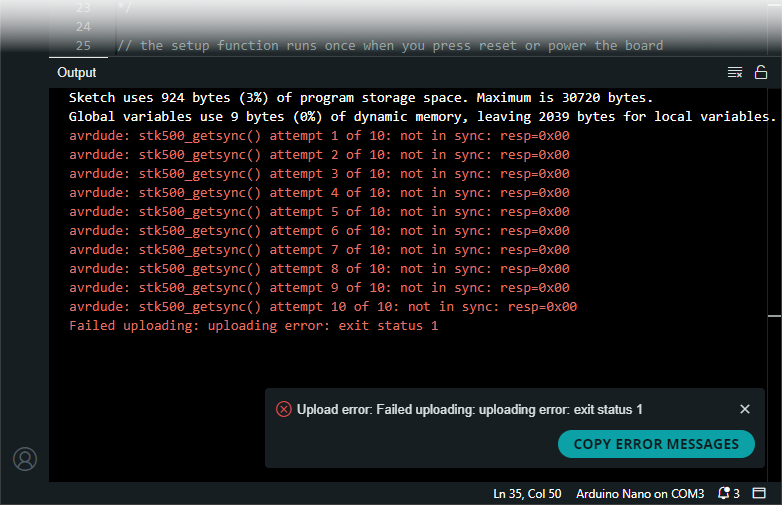
Hopefully when I made photo for this article intro, I noticed that Arduino Nano might not be dead, it has ATmega168 chip instead of ATmega328 🤦♂️. Easy to overlook in a dim light. So double check exact version, sometimes there are more options (ATMega328 vs ATMega168, old bootloader, 16MHz vs 8MHz, …)
Installation on Linux (Fedora 39)
- Download as ZIP file and unpack it
- Add user (named pavel) to dialout group (this step may specific to Fedora)
1
sudo usermod -a -G dialout pavel
- Make this change effective (I installed updates and restarted PC)
- Run arduino ide
1 2
cd ~/dev-arduino/arduino-ide_2.3.2_Linux_64bit/ ./arduino-ide - Basically follow the same steps as in Windows installation, it’s actually easier as it does not install various serial port drivers.
Arduino versions
At the moment I have several
- Arduino Uno (clone): Not my favorite. It has weird pin headers and wiring is a mess. Unless tiny protoboard is thrown on top of it, then it works for trying one device quickly.
- Arduino Nano (clone): I have old one with AtMega168 chip. It has limited memory capacity, but works for prototyping on breadboard. Or at least as a 5V/3.3V power supply :-)
- Arduino Nano Every: This, on the other hand, has the most memory (both flash and RAM). Extremely annoying feature is that it lacks pin description - having it on bottom side is useless.
- Arduino Pro Mini: This one is good for stand-alone, battery-powered applications when power LED is mechanically disabled. It does not have USB port and needs USB-Serial converter for programming.
Side note
- Raspberry Pi Pico: this microcontroller is cheaper, faster, maybe even easier to use with MicroPython and I don’t think I’ll use Arduino for some permanent projects that are powered from USB.
Bonus stuff
Arduino Nano Every Pinout
Because Arduino Nano Every has pin description printed at the bottom, here’s the pinout for reference, which is useful when it’s placed on breadboard. USB connector is UP.
| Row | Left | Right |
|---|---|---|
| 1 | D13/SCK | D12/MISO |
| 2 | 3V3 | D11/MOSI |
| 3 | AREF | D10/SS |
| 4 | A0 | D9 |
| 5 | A1 | D8 |
| 6 | A2 | D7 |
| 7 | A3 | D6 |
| 8 | A4/SDA | D5 |
| 9 | A5/SCL | D4 |
| 10 | A6 | D3 |
| 11 | A7 | D2 |
| 12 | 5V | GND |
| 13 | RST | RST |
| 14 | GND | D0/RXD |
| 15 | VIN | D1/TXD |
1
2
3
4
5
6
7
8
9
10
MOSI   : SPI Master Out -> Slave In
MISO   : SPI Master In  <- Slave Out
SS(CS) : SPI Slave (Chip) Select
SCK    : SPI Clock

SDA    : I²C Serial Data
SCL    : I²C Serial Clock Line

TXD    : UART Transmit Data
RXD    : UART Recieve Data
Serial Port Terminal Emulator
After trying
CoolTerm seems works the best (note added later: it depends).
PuTTY is painful to configure (for logging) and may interpret some control bytes, perform line end conversions and mangle binary data. It does not detect serial ports present.
I had trouble using Serial Port Terminal Emulator, once it did not seem to communicate. Logging works, but for example EEPROM dump must be done when in receive group HEX format is selected and log file then contains header and hexadecimal output as text with 16 bytes per row.
Well … it seems that sending binary data over serial port is horrible idea anyways.
Soldering tips
- GreatScott! -=- How to Solder properly, Through-hole (THT) & Surface-mount (SMD)
- Daniele Tartaglia -=- 10 Stupid Errors To Avoid in Soldering and TIPS
- EEVblog #180 - Soldering Tutorial Part 1 - Tools
TL;DR: 350°C temperature
Final words
I had one project nearly finished and sleeping since 2016 to re-learn something about electronics: my goal was to build a data logger with low power consumption and run time of weeks or months. And device that monitors temperature, humidity, air pressure, battery voltage.
Basics were quite easy, but low power consumption posed a challenge. It’s likely that not all considerations were optimal and for example using EEPROM is much better option. However I have many notes on which I can build and many other notes missing from this project. Even thou this is written from two thirds, I’m afraid that polishing article may take more time than writing it, so it’s going to be separated into short articles.
Backlog of future articles:
- Arduino Pin states
- Arduino “secrets” (measuring vcc)
- Weather station
- Using temperature sensors (BM280, …)
- Storage
- Writing data to SD card
- Using EEPROM
- Using Flash
- Power: batteries, low voltage shutdown
- Monitoring power consumption (INA219)
- Using RTC: DS3231 (or alternatives), setting time, reading time, setting alarm
- Using transistors as a switch
- Lowering power consumption
- Power LED (TODO: link to logger v2, mention it here)
- SD card and voltage regulator on reader
- ADCs (TODO: link to logger v2)
- ?
- Summary, links, …
TODO: move this to separate introduction, once ready
Changes
- 2024-12-23: Added section mentioning Arduino obsolescence