ENG | XIAO-nRF52840 bootloader recovery
Repairing a Bricked Seeed XIAO nRF52840 (Sense) Bootloader via Raspberry Pi Pico Debug Probe
What happened?
I played with SPI flash and accidentally used internal one.
Don’t skip
.storage_devline if program fails to compile due to wrong macro and compiles without it. Program will default to internal flash. Note hatqspi_storagelabel must be defined in the device tree.
When you do it you won’t be able to reset board, OS won’t recognize USB device at all and you may see some messages in eventvwr on Windows or dmesg on Linux and you won’t be able to enter bootloader mode. However it’s not all lost yet.
Prerequisites
Reality check
When USB device is not recognized at all, only way how to fix it is via debug interface on bottom side and process is described in this article.
When it enters boot mode, but only something (typically MBR) is overwritten, you won’t be able to run any correctly uploaded programs - they will be ignored, because your program will be executed first, no matter if it works. But recovery is easier (few minutes) and described in the other article and only requires uploading firmware via usb-serial interface and Python script.
Hardware
- Raspberry Pi Pico (version 1 or 2)
- XIAO Expansion board (for exposing debug pins)
Raspberry Pi Pico Debugprobe firmware
Raspberry Pi Pico has debugprobe firmware which is mentioned in Getting Started with Pico, chapter Debug with a second Pico or Pico 2. It transforms Raspberry Pi Pico into USB to SWD&UART bridge (serial wire debug).
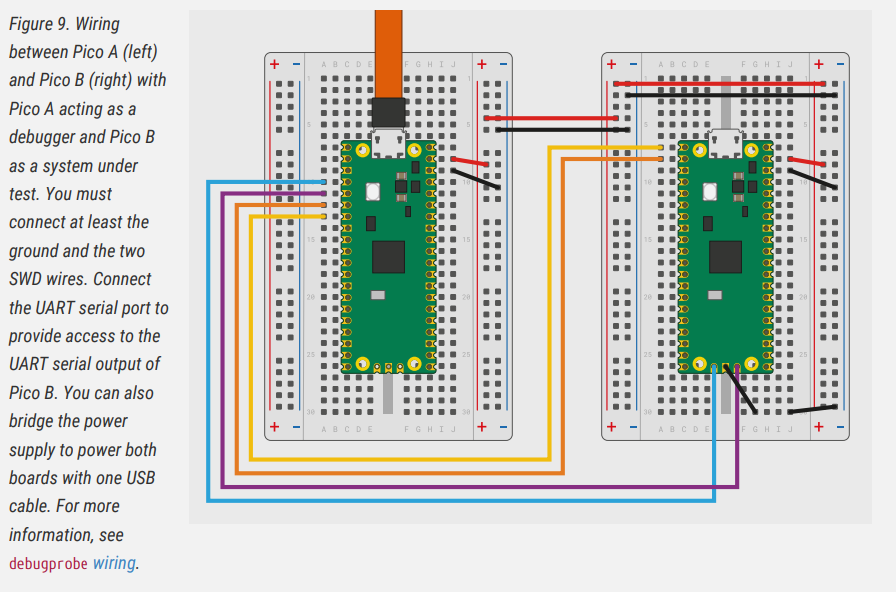 Credits: Raspberry Pi Foundation
Firmware can be downloaded on github and file what you need is likely debugprobe_on_pico.uf2 or debugprobe_on_pico2.uf2
Download it and copy it to device in bootloader mode (hold BOOTSEL button while plugging device in).
Raspberry Pi Pico should show as
1
2
3
4
[pavel@marten -=- ~/Downloads]$ lsusb
Bus 001 Device 001: ID 1d6b:0002 Linux Foundation 2.0 root hub
Bus 001 Device 123: ID 2e8a:000c Raspberry Pi Debugprobe on Pico (CMSIS-DAP)
Bus 002 Device 001: ID 1d6b:0003 Linux Foundation 3.0 root hub
XIAO nRF52840 Sense firmware (bootloader)
It does not matter if you have Sense version (with microphone and accelerometer) or not. Get firmware for sense. It was preloaded on this board anyways. Differences are:
- Partition label is
XIAO-BOOTvsXIAO-SENSE- Different USB ID
west flash(Zephyr RTOS command) cannot be used:
Download hex firmware from github, preferably using browser: https://github.com/0hotpotman0/BLE_52840_Core/tree/main/bootloader/Seeed_XIAO_nRF52840_Sense
I did it using wget and verified that file looks as expected.
1
2
3
4
5
6
7
8
9
10
[pavel@marten -=- ~/Downloads]$ wget https://github.com/0hotpotman0/BLE_52840_Core/raw/refs/heads/main/bootloader/Seeed_XIAO_nRF52840/Seeed_XIAO_nRF52840_bootloader-0.6.1_s140_7.3.0.hex
HTTP response 302  [https://github.com/0hotpotman0/BLE_52840_Core/raw/refs/heads/main/bootloader/Seeed_XIAO_nRF52840/SeeAdding URL: https://raw.githubusercontent.com/0hotpotman0/BLE_52840_Core/refs/heads/main/bootloader/Seeed_XIAO_nRF52840/Adding URL: https://raw.githubusercontent.com/0hotpotman0/BLE_52840_Core/refs/heads/main/bootloader/Seeed_XIAO_nRF52840/Saving 'Seeed_XIAO_nRF52840_bootloader-0.6.1_s140_7.3.0.hex'
HTTP response 200  [https://raw.githubusercontent.com/0hotpotman0/BLE_52840_Core/refs/heads/main/bootloader/Seeed_XIAO_nSeeed_XIAO_nRF52840_ 100% [=====================================================================>]  211.00K    --.-KB/s
                          [Files: 1  Bytes: 211.00K [177.76KB/s] Redirects: 1  Todo: 0  Errors: 0]
[pavel@marten -=- ~/Downloads]$ head -5 Seeed_XIAO_nRF52840_bootloader-0.6.1_s140_7.3.0.hex
:04000003F000AE1546
:020000040000FA
:1000000000040020810A000015070000610A0000BA
:100010001F07000029070000330700000000000050
:10002000000000000000000000000000A50A000021
OpenOCD
OpenOCD, the Open On-Chip Debugger is hopefully present in major Linux distributions, such as Fedora and can be installed using package manager. It also exists for Windows, but I haven’t tried.
1
sudo dnf in openocd
Flashing bootloader
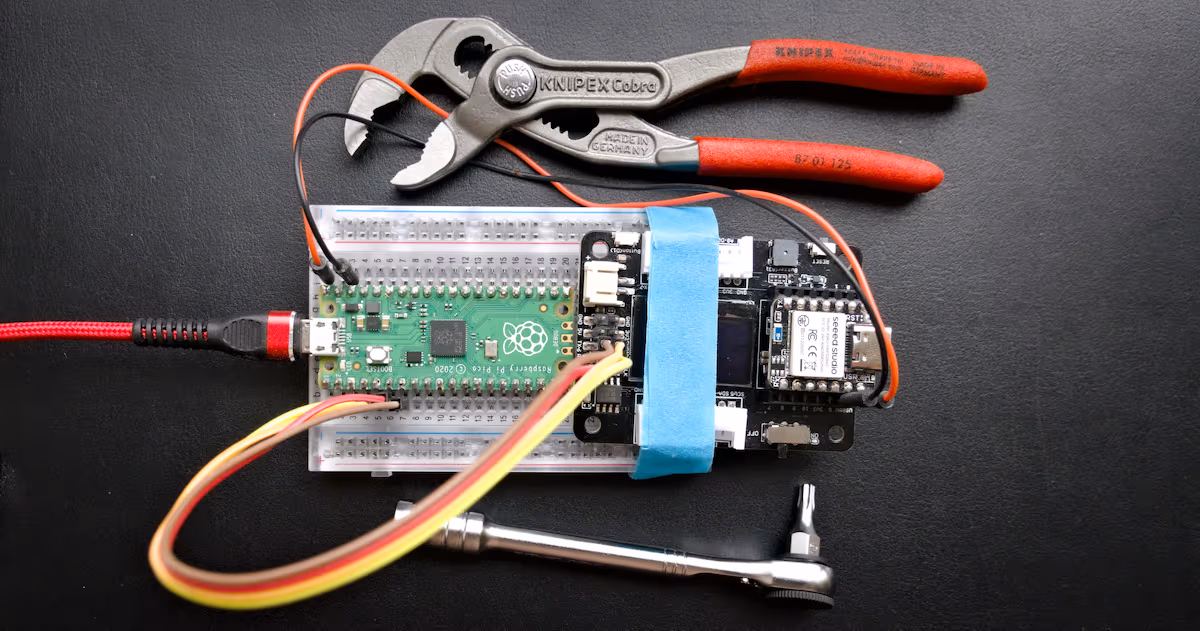
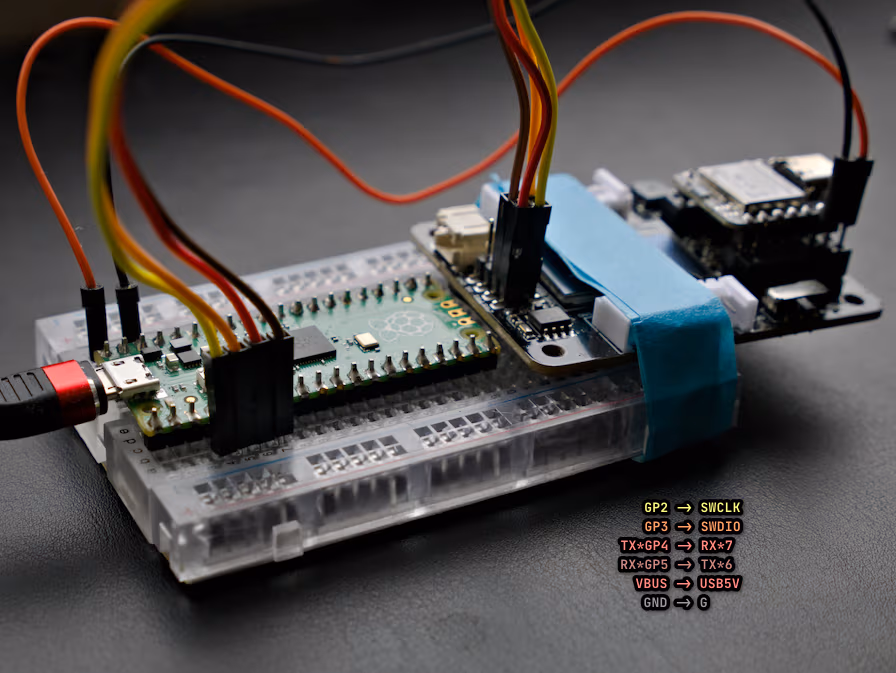
Wiring Raspberry Pi Pico and XIAO nRF52840
First we need to wire boards together. Note that serial communication is actually not needed.
Rewriting firmware
Once we have
- OpenOCD tool installed
- Raspberry Pi Pico with debugprobe firmware installed
- Target firware/bootloader downloaded
We can plug in Raspberry Pi Pico and type
1
2
3
4
5
6
7
8
9
10
11
12
13
14
15
16
17
18
19
20
21
22
23
24
25
26
27
28
29
30
31
32
33
34
35
36
37
38
39
40
41
42
43
44
45
46
47
48
49
50
51
52
53
[pavel@marten -=- ~/Downloads]$ openocd -f interface/cmsis-dap.cfg -f target/nrf52.cfg -c init -c halt -c "nrf5 mass_erase" -c "program Seeed_XIAO_nRF52840_bootloader-0.6.1_s140_7.3.0.hex verify"
Open On-Chip Debugger 0.12.0
Licensed under GNU GPL v2
For bug reports, read
        http://openocd.org/doc/doxygen/bugs.html
Info : auto-selecting first available session transport "swd". To override use 'transport select <transport>'.
Info : Using CMSIS-DAPv2 interface with VID:PID=0x2e8a:0x000c, serial=E66118604B809B27
Info : CMSIS-DAP: SWD supported
Info : CMSIS-DAP: Atomic commands supported
Info : CMSIS-DAP: Test domain timer supported
Info : CMSIS-DAP: FW Version = 2.0.0
Info : CMSIS-DAP: Interface Initialised (SWD)
Info : SWCLK/TCK = 0 SWDIO/TMS = 0 TDI = 0 TDO = 0 nTRST = 0 nRESET = 0
Info : CMSIS-DAP: Interface ready
Info : clock speed 1000 kHz
Info : SWD DPIDR 0x2ba01477
Info : [nrf52.cpu] Cortex-M4 r0p1 processor detected
Info : [nrf52.cpu] target has 6 breakpoints, 4 watchpoints
Info : starting gdb server for nrf52.cpu on 3333
Info : Listening on port 3333 for gdb connections
Warn : [nrf52.cpu] target was in unknown state when halt was requested
Info : nRF52840-xxAA(build code: D0) 1024kB Flash, 256kB RAM
Info : Mass erase completed.
[nrf52.cpu] halted due to debug-request, current mode: Thread
xPSR: 0x01000000 pc: 0xfffffffe msp: 0xfffffffc
** Programming Started **
Info : Padding image section 0 at 0x00000b00 with 1280 bytes
Info : Flash write discontinued at 0x00026498, next section at 0x000f4000
Warn : Adding extra erase range, 0x00026498 .. 0x00026fff
Info : Padding image section 2 at 0x000fc3d4 with 5164 bytes
Warn : Adding extra erase range, 0x000fd858 .. 0x000fdfff
Warn : Adding extra erase range, 0x10001000 .. 0x10001013
Warn : Adding extra erase range, 0x1000101c .. 0x10001fff
** Programming Finished **
** Verify Started **
** Verified OK **
Info : Listening on port 6666 for tcl connections
Info : Listening on port 4444 for telnet connections
^Cshutdown command invoked

[pavel@marten -=- ~/Downloads]$ lsusb
Bus 001 Device 001: ID 1d6b:0002 Linux Foundation 2.0 root hub
Bus 001 Device 025: ID 2357:0604 TP-Link TP-Link UB500 Adapter
Bus 001 Device 067: ID 2886:0044 Seeed Technology Co., Ltd. XIAO nRF52840
Bus 002 Device 001: ID 1d6b:0003 Linux Foundation 3.0 root hub

[pavel@marten -=- ~/Downloads]$ udisksctl mount -b /dev/sda
==== AUTHENTICATING FOR org.freedesktop.udisks2.filesystem-mount ====
Authentication is required to mount Adafruit nRF UF2 (/dev/sda)
Authenticating as: Pavel Perina (pavel)
Password:
==== AUTHENTICATION COMPLETE ====
Mounted /dev/sda at /run/media/pavel/XIAO-BOOT
Great. Some articles mention sudo command, but it was not needed.
OpenOCD Arguments:
openocd -f interface/cmsis-dap.cfg -f target/nrf52.cfg -c init -c halt -c "nrf5 mass_erase" -c "program file.hex verify" -c reset -c exit
-f interface/cmsis-dap.cfg: Load configuration for CMSIS-DAP interface (your Pico debug probe)-f target/nrf52.cfg: Load configuration for nRF52 target chip (defines memory layout, flash controller, etc.)-c "command": Execute a command (multiple -c options run sequentially)
OpenOCD Commands Explained:
init
- Purpose: Initialize the debug interface and target
- What it does:
- Establishes SWD connection
- Detects the target chip
- Sets up flash drivers
- Prepares everything for debugging/programming
halt
- Purpose: Stop the CPU from executing
- What it does:
- Sends debug halt request via SWD
- CPU stops whatever it’s doing
- Necessary before doing memory operations
- Without this, the CPU might interfere with flash operations
nrf5 mass_erase
- Purpose: Erase the entire flash memory
- Note: This is nRF5-specific, other chips use different commands
- What it does:
- Uses Nordic’s specific flash controller command
- Erases all user flash (not just sectors)
- Clears both application and user data
- Faster than erasing individual sectors
program file.hex verify
- Purpose: Flash the hex file and verify it
- What it does:
program: Writes the hex file to flash memoryverify:Reads back the flash and compares with the original file- OpenOCD automatically handles:
- Parsing the hex file addresses
- Erasing only necessary flash sectors
- Programming in appropriate chunk sizes
- Handling different memory regions
reset
- Purpose: Reset the target chip
- What it does:
- Releases the CPU from halt
- Triggers a system reset
- CPU starts executing from the reset vector (usually the bootloader)
exit
- Purpose: Quit OpenOCD
- What it does:
- Closes debug connection
- Shuts down OpenOCD cleanly
- Without this, OpenOCD stays running with servers active
The key insight is that halt stops the bad Zephyr application before it can interfere with the debug interface, allowing you to erase and reprogram the chip and nrf5 mass_erase removes that application and all data from memory. Without this, only bootloader gets written, but application remains on flash, gets executed and damages bootloader again.
Short version
1
2
3
sudo dnf in openocd # Use your own package manager
wget https://raw.githubusercontent.com/0hotpotman0/BLE_52840_Core/refs/heads/main/bootloader/Seeed_XIAO_nRF52840_Sense/Seeed_XIAO_nRF52840_Sense_bootloader-0.6.1_s140_7.3.0.hex
openocd -f interface/cmsis-dap.cfg -f target/nrf52.cfg -c init -c halt -c "nrf5 mass_erase" -c "program Seeed_XIAO_nRF52840_Sense_bootloader-0.6.1_s140_7.3.0.hex verify" -c reset -c exit