ENG | Getting started with NRF52840 Dongle - Welcome to hell.
How hard could be to compile and upload blinky in nRF ecosystem?
Retrospective introduction
(Written week later, after getting more familar with product)
This article describes struggle with nRF52840 Dongle and first steps. Main source of pain is that documentation is rich, but very fragmented and hard to navigate. The same applies to toolsets - and it does not have any getting started guide. Article is written in chronological order. Once I got through this, using device is actually quite easy (I’d suggest using either Zephyr RTOS (for C) or MicroPython and nrfutil only - depending on your needs and entirely avoiding Nordic semiconductor SDK).
Also, I suggest getting XIAO nRF52840 which easier to use with various Arduino modules and physical hardware and does not need any special tools, which are often just points of failure.
Why to get it
I expected the nRF52840 dongle might be ideal for low power data loggers, BLE sensors, or weather stations. Arduino can suffice for data logger, but when I build temperature sensor based on Raspberry Pi Pico in previous project, I found need of USB charger and data transfers over WiFi and HTTP maybe a bit overkill. Again, it gets the job done, but why not to learn something new?
If the format of USB dongle is the most suitable is something I haven’t decided yet (future note: for BLE development only). Another piece from Xiao Seeed is on the way at the time of writing.
What surprised me was how complicated things could be when there are three tools for everything - each in various phases of obsolescence or early adoption - leaving the user to realize what actually works and use the right combination. Fully supported systems are Windows 10, Ubuntu 22.04 LTS and some version of MacOS.
Where to get it
I got nRF52840 Dongle (PCA10059) from AliExpress, it can be obtained elsewhere, but Mouser or Farnell required to pay significant money for small/cheap orders and I’m not sure why I did not ordered it from TME which has about the same price as AliExpress.
First pluggin in
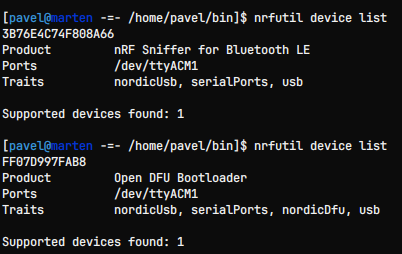
When first plugged-in it’s detected as serial USB device which constantly transmits some binary data. USB ID is 1915:522a and nRF Sniffer for Bluetooth LE on Linux. Maybe it has this functionality uploaded as firmware. Indeed, it does and it can be found on official website
1
dmesg
1
2
3
4
5
6
7
8
9
[3523765.421854] usb 1-2: new full-speed USB device number 3 using xhci_hcd
[3523765.549294] usb 1-2: New USB device found, idVendor=1915, idProduct=522a, bcdDevice= 2.04
[3523765.549309] usb 1-2: New USB device strings: Mfr=1, Product=2, SerialNumber=3
[3523765.549316] usb 1-2: Product: nRF Sniffer for Bluetooth LE
[3523765.549321] usb 1-2: Manufacturer: ZEPHYR
[3523765.549325] usb 1-2: SerialNumber: 3B76E4C74F808A66
[3523766.162209] cdc_acm 1-2:1.0: ttyACM0: USB ACM device
[3523766.162240] usbcore: registered new interface driver cdc_acm
[3523766.162242] cdc_acm: USB Abstract Control Model driver for USB modems and ISDN adapters
1
lsusb
1
2
3
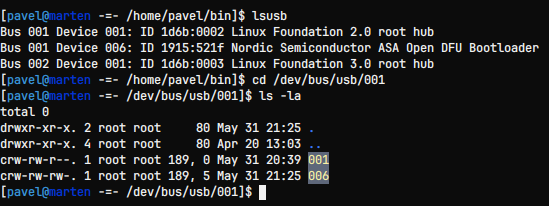
Bus 001 Device 001: ID 1d6b:0002 Linux Foundation 2.0 root hub
Bus 001 Device 003: ID 1915:522a Nordic Semiconductor ASA nRF Sniffer for Bluetooth LE
Bus 002 Device 001: ID 1d6b:0003 Linux Foundation 3.0 root hub
Actually, the USB ID changes with firmware, so it’s a bit irrelevant.
Installing tools
This is pretty easy. Documentation is comprehensive so in theory everything should be fine. Except documentation lacks step-by-step guides, is full of references, and in the end you don’t even know what to install and why the hell it does not work.
- Download and install Segger JLink. In my case I downloaded RPM (I’m using Fedora 42, btw) and installed it by
sudo rpm -i JLink_Linux_V838_x86_64.rpm). It says “This package provides software tools for SEGGER J-Link debug probes.” - don’t ask me. - Download nrfutil, copy it to your
~/bindirectory and make it executablechmod +x nrfutil. Then typenrfutil install nrf5sdk-toolsandnrfutil install device - Download and upgrade nRF Connect for Desktop Apps, you may copy it to your
~/binand make it executable. Don’t expect much from it, so you won’t be disappointed. Basically nothing works. It will create some folders in~/optand who knows where else. - Install
nRF Connect for VS Codeextension for VS code. It will take some time. Some files will appear in~/ncsdirectory - compilers, Zephyr RTOS. SDK version 3.0.1 had some problems, 2.9.1 worked. - Visit https://github.com/NordicSemiconductor/nrf-udev and adapt. It should make USB device accessible for all users.
- I installed it this way:

- And verified it:
- I installed it this way:
Compiling blinky
I guess you need to open extension menu, go through Get Started with the nRF Connect SDK checklist on Welcome screen, find that in Applications, there is Add build configuration where you select nRF52840 Dongle from long list of devices which is not in alphabetical order (yes, i’m still complaining) and build it. But you need to build it from ACTIONS->Build instead of default (complaining again).
Switching to Bootloader mode
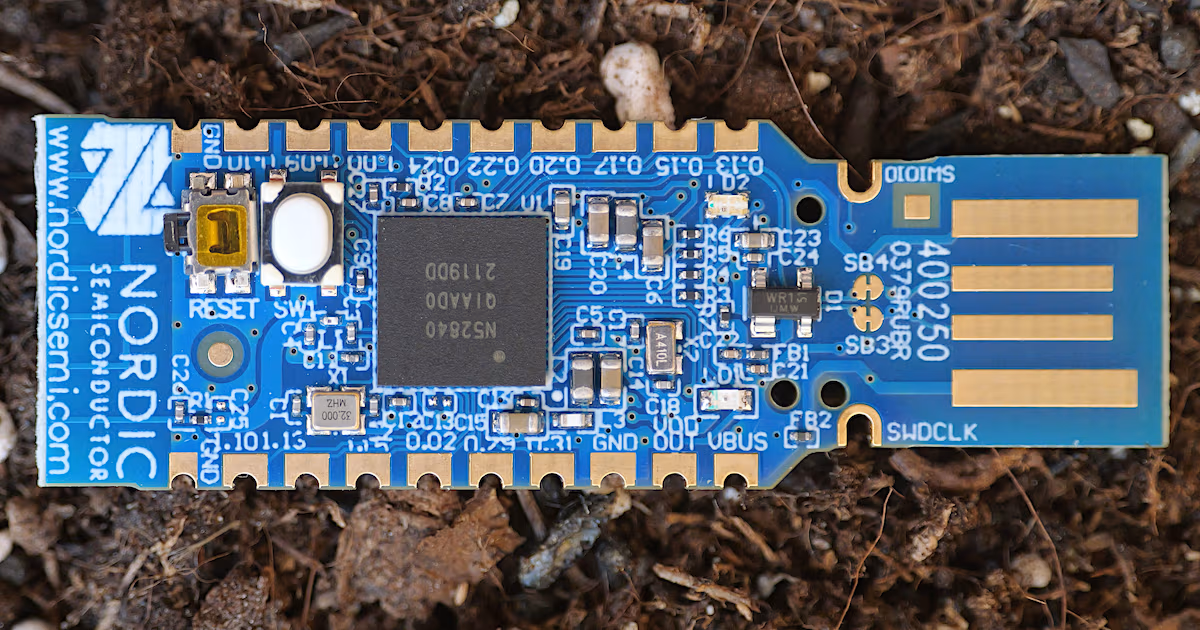
Some wise guy decided that it would be great fun to add invisible reset button next to very visible user button. Documentation does not even explicitly state how to enter boot mode, so you have to google it once you encounter a hint that such a thing exists.
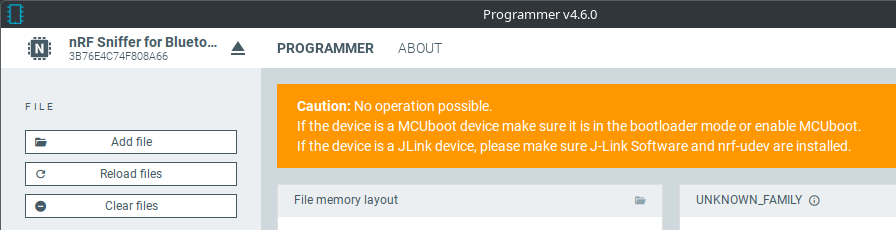 Programmer requires bootloader mode
 When you look carefully
 RESET button is located next to SW1, it does not look like a button and it’s pressed from the rear/aft side.
In the end, unlike Raspberry Pi Pico, you can press this button at any time, not just while plugging it in, so maybe it’s good it cannot be pressed by accident. But there are so many annoyances like that and every one of them takes ten minutes to realize and google solution.
 Checking boot mode
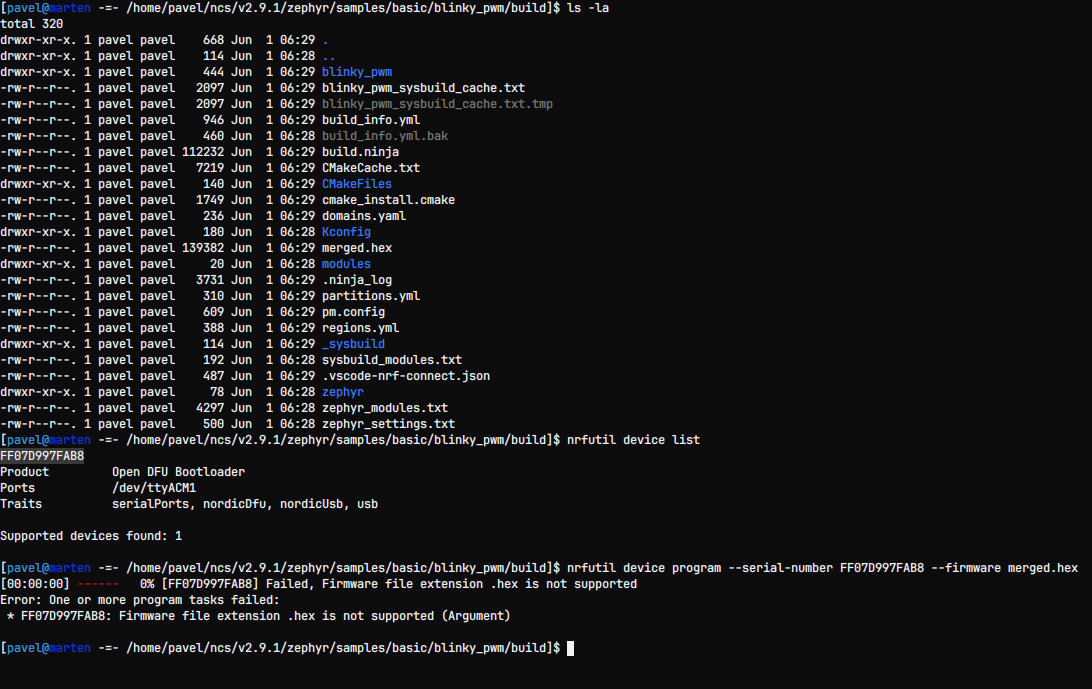
Flashing firmware
Struggle does not end here. I assume that developers of toolset for nRF ecosystem are a bunch of sadistic psychopats.
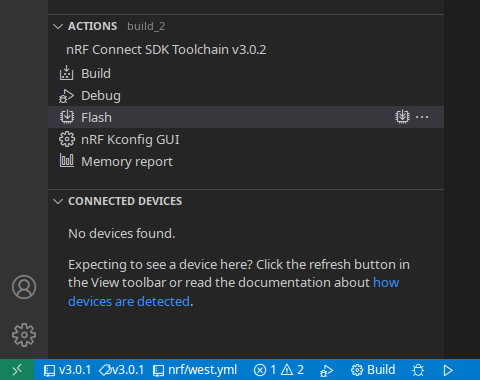
As before, nrfutil device list can see it. NRF programmer can see it too. Now it does not even complain about boot mode.
Naively flashing it from command line does not work neither
What actually works is Programmer from nRF Connect for Desktop Apps, where you can drop file (after clearing old ones).
Wait, there is a documentation specific for nRF52xxx series. It mentions reset button and options of uploading firmware and compiling it with west tool which is a part of Zephyr. But I did not found it first.
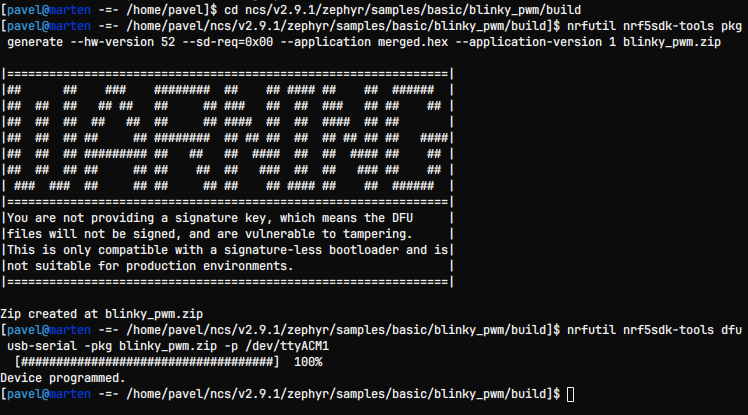
Restoring BLE sniffer
Firmware is impossible to find, but when you follow some hints in the documentation, it turns out that both firmware and software are are in .nrfutil directory on Linux.
1
2
3
4
5
6
# Find nrfutil module
nrfutil search sniffer
# Instal ble-sniffer module
nrfutil install ble-sniffer
# It installs firmware, navigate through `~/.nrfutil/share using autocomplete
nrfutil nrf5sdk-tools dfu usb-serial -pkg ~/.nrfutil/share/nrfutil-ble-sniffer/firmware/sniffer_nrf52840dongle_nrf52840_4.1.1.zip -p /dev/ttyACM0
Conclusion
Well, maybe using Zephyr and standard tools instead of Nordic tools (which hides standard ones under the hood) is not a bad idea. I was already considering it for Raspberry Pi Pico and C++, but then I found MicroPython more comfortable and sufficient. Time to explore it?
Screw it. Back to gardeing and replanting chilli. It’s more satisfying. I wasted like six hours uploading blinky and right now I’m not in the mood to continue.
Next day I tried programming device in a way described in a documentation. VICTORY!
Addendum (2025-06-03): Recap and quick comparison with XIAO Seeed
nRF52840 Dongle
- Preloaded
nRF Sniffer for Bluetooth LEfirmware - Enters USB DFU Bootloader mode by holding
RESET(notSW1) button - In bootloader mode appears as
ASA Open DFU Bootloaderwith USB VID:PID 1915:521f - Has Visual Studio Code extension, which contains ARM compiler and Zephyr RTOS
- Has nRF Connect desktop app (appimage) with tools such as programmer.
- Can be flashed by Programmer (part of nRF Connect for Desktop) or
1
2
nrfutil nrf5sdk-tools pkg generate --hw-version 52 --sd-req=0x00 --application merged.hex --application-version 1 <package.zip>
nrfutil nrf5sdk-tools dfu usb-serial -pkg <package.zip> -p /dev/ttyACM0`
- Zephyr, MicroPython support (
with limited BLEwithout working BLE) - NOTE: Segger J-Link is not needed at all - at least for regular flashing. It requires hardware and soldering wires to the dongle’s SWD (Serial Wire Debug) pins and is typically only needed for bootloader recovery or full flash erase on ARM Cortex-M devices. I found this later and confirmed this on Windows. It might be prerequisite for nRF Connect app thou.
- NOTE: nrf5sdk-tools is optional part of commands above (but it must be installed)
Summary:
Due to format, it’s basically good for Bluetooth LE development and not much else. Using battery power is problematic (requires changing solder bridges), using peripherals needs soldering pins and USB male to USB female extension cable which I haven’t used since PCs have front USB panels.
Using a dongle with Zephyr RTOS and nrfutil is actually quite easy, once you explore paths that do not work. I’d suggest skip VS Code extension, nRF Connect Desktop and JLink entirely.
Verdict: I don’t recommend it.
Seeed Studio XIAO nRF52840
- Preloaded Arduino firmware (I think)
- Comes with UF2 bootloader
- Bootloader mode is accessed by pressing
RSTbutton twice - it appears as 32MB usb drive (VID:PID 2886:0045) - Compatible with Zephyr, Arduino, MicroPython (without BLE) and others.
- It is possible to use it with Seeed Studio XIAO expansion board for early experiments with I2C, SPI, … .
- On board 2MB flash (sense version has accelerometer and microphone)
- No power LED - likely suitable for energy efficient applications
- Has Getting started tutorial so I hopefully would not need to write my own notes 😀
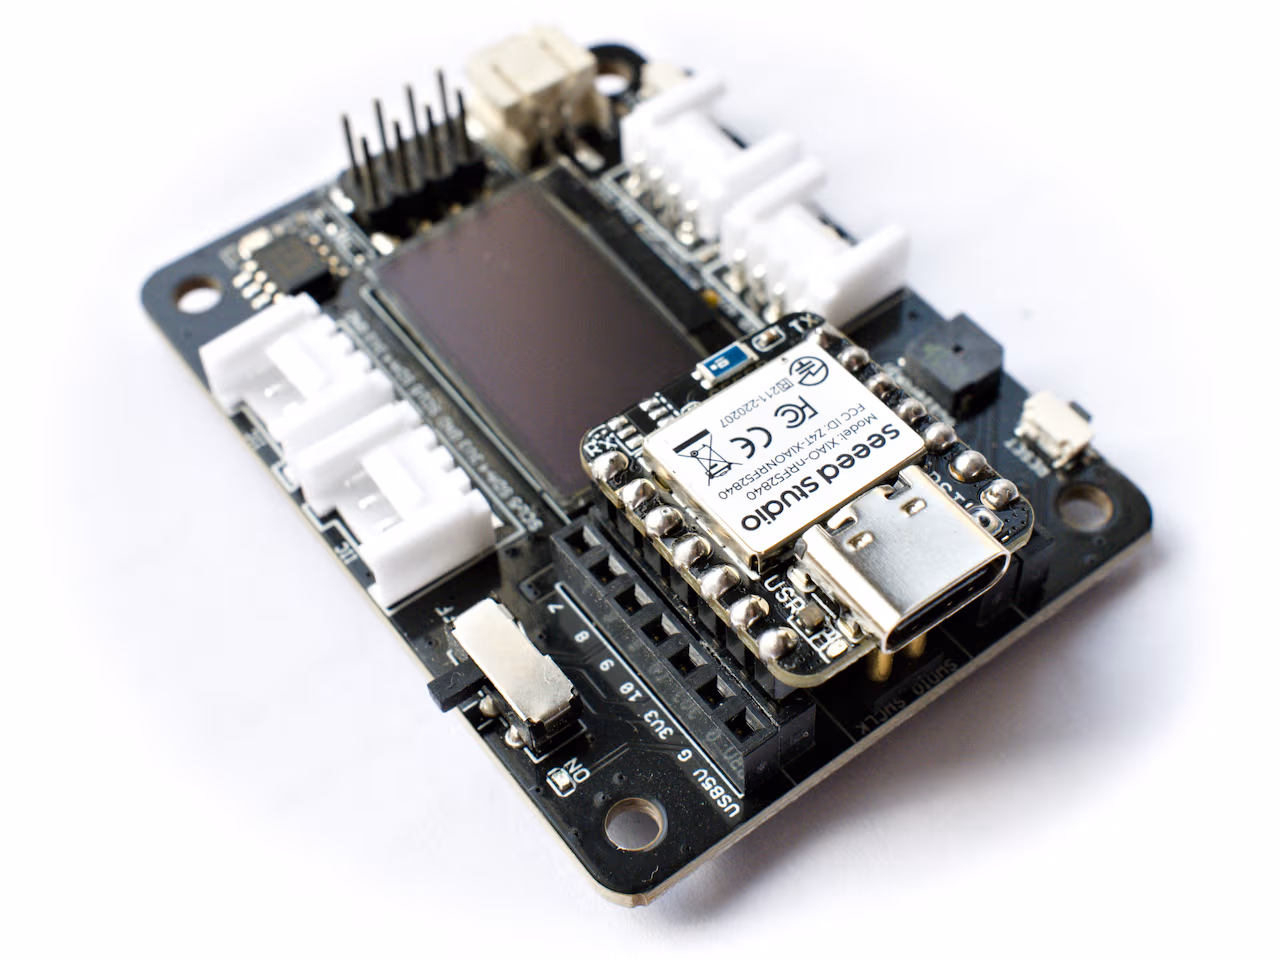 XIAO Seeed nRF52840 with expansion board
In my opinion product from Seeed Studio is better - and by far. The reason is expansion board for prototyping, onboard flash, easier uploads, option to power it from battery and I did not explore using LiPo battery.
For MicroPython projects, I’d suggest using Raspberry Pi Pico, which is cheap, well documented, has large community, and there is option with external WiFi and Bluetooth chip (Pico W) which works.
Verdict: It feels as promising alternative to Arduino, when using with Zephyr RTOS. But learning curve is steep. Very steep. Price is a bit high for usecases not using BLE.
Links
- nRF52840 Dongle product page
- nRF52840 DK Development Kit - more expensive, larger board
- nRF52840 Dongle documentation
- nRF Development tools
- nRF Utils
- nRF Sniffer for Bluetooth LE download
- How to Use nRF52840 Dongle for BLE Sniffing with Wireshark YouTube video
- Zephyr
- XIAO nRF52840
- XIAO nRF52840 with Zephyr OS