ENG | Zephyr RTOS Hello World: Setup and Troubleshooting.
First steps with Zephyr OS on nRF52840 and Raspberry Pi Pico. Hello world could be easy. When it works.
Getting Hello World running should be straightforward. Here’s the minimal setup and what to do when it inevitably doesn’t work as expected.
Project structure
The minimal project consists of these files:
src/main.c
1
2
3
4
5
6
7
#include <stdio.h>

int main(void)
{
  printf("Hello world\n");
  return 0;
}
Nothing Zephyr-specific here.
CMakelists.txt
Make sure you won’t name file
main.cppbutmain.c. It’s automatic for me and I’m completely blind when CMake cannot find it 🤦♂️
1
2
3
4
cmake_minimum_required(VERSION 3.20.0)
find_package(Zephyr REQUIRED HINTS $ENV{ZEPHYR_BASE})
project(hello_world)
target_sources(app PRIVATE src/main.c)
This is pretty standard CMakeLists.txt file. It looks for Zephyr, preferably in directory set by ZEPHYR_BASE environment variable, which is hopefully set by virtual environment.
Somehow project keyword is needed and app cannot be changed. Or maybe can, but for now it’s not worth it.
prj.conf
1
# Intentionally empty
Here are usually some drivers, but we don’t need any.
Building project
Linux/Native
Yes, executable file is zephyr.exe just like on Windows. It’s not a bug.
1
2
3
4
5
6
7
8
9
10
[pavel@marten -=- ~]$ cd zephyrproject
[pavel@marten -=- ~/zephyrproject]$ source .venv/bin/activate
(.venv) [pavel@marten -=- ~/zephyrproject]$ cd my_projects
(.venv) [pavel@marten -=- ~/zephyrproject/my_projects]$ west build -p -b native_sim/native/64 hello_world
(.venv) [pavel@marten -=- ~/zephyrproject/my_projects]$ build/zephyr/zephyr.exe
*** Booting Zephyr OS build v4.1.0-5582-g2c5c0e24e8fd ***
Hello world

^C
Stopped at 6.030s
Windows/Native
Ehm, sorry. In theory west build --pristine --board native_sim/native/64 my_projects/hello_world should work. But there is no gcc which targets Windows/x64 or Windows/x86 platforms as of June 2025.
Windows -> nRF52840 dongle
1
2
3
4
5
6
7
8
9
10
11
12
13
14
PS C:\Users\pavel> cd C:\dev-zephyr\zephyrproject\
PS C:\dev-zephyr\zephyrproject> .\.venv\Scripts\activate
(.venv) PS C:\dev-zephyr\zephyrproject> west build --pristine --board nrf52840dongle my_projects/hello_world
(.venv) PS C:\dev-zephyr\zephyrproject> C:\apps\nrfutil.exe pkg generate --hw-version 52 --sd-req=0x00 --application build\zephyr\zephyr.hex --application-version 1 hello_world.zip
Zip created at hello_world.zip
(.venv) PS C:\dev-zephyr\zephyrproject> c:\apps\nrfutil.exe dfu usb-serial -pkg .\hello_world.zip -p COM7
  [####################################]  100%
Device programmed.
(.venv) PS C:\dev-zephyr\zephyrproject> mpremote connect COM6
Connected to MicroPython at COM6
Use Ctrl-] or Ctrl-x to exit this shell
*** Booting Zephyr OS build v4.1.0-5418-g98ba754013b0 ***
Hello world
(.venv) PS C:\dev-zephyr\zephyrproject>
Yes, I’m aware than device is once COM7 and once COM6. This is not a bug - it’s a feature of Windows. Don’t ask me, it really uses different port in bootloader mode and when running. I guess it might be due to different VID:PID (USB vendor/product IDs) so for Windows, it’s a different device. Sometimes it is COM14.
I’m also aware that mpremote is part of MicroPython installed by pip install mpremote, but it’s convenient.
Linux -> Raspberry Pi Pico (or XIAO RP2040)
This is fun. It does not work by default, because Serial-via-USB does not work and needs to be compiled. I did not want to dive into this when compiling hello world example (even provided one does not work), but with all troubles, article is becoming longer than anticipated.
Solution 1: config+overlay (first found, inferior)
It’s quite well described in the YouTube video Mr. Green’s Workshop -=- Zephyr RTOS, Dive into USB CDC ACM, Overlays, Custom Conf, and Cmake with the Raspberry Pi Pico Ep.5 and shown in Zephyr samples: USB console.
We need to override the default console from UART (uart0) to USB (cdc-acm-uart)
1
2
3
4
5
6
7
8
9
10
/ {
    chosen {
        zephyr,console = &usb_cdc;
    };
};
&zephyr_udc0 {
    usb_cdc: usb_cdc_0 {
        compatible = "zephyr,cdc-acm-uart";
    };
};
And then we need to add some drivers and properties. It seems that these are minimum:
1
2
3
4
5
6
7
CONFIG_USB_DEVICE_STACK=y
CONFIG_USB_DEVICE_PRODUCT="Zephyr USB console"
# We don't want extra code for that in main()
CONFIG_USB_DEVICE_INITIALIZE_AT_BOOT=y
CONFIG_USB_DEVICE_PID=0x0004
CONFIG_SERIAL=y
CONFIG_CONSOLE=y
We saved them into separate files which are specific to Raspberry Pi Pico.
Build using
1
2
3
4
[pavel@marten -=- ~]$ cd zephyrproject
[pavel@marten -=- ~/zephyrproject]$ source .venv/bin/activate
(.venv) [pavel@marten -=- ~/zephyrproject]$ cd my_projects/hello_world
(.venv) [pavel@marten -=- ~/zephyrproject/my_projects/hello_world]$ west build -p -b rpi_pico . -- -DOVERLAY_CONFIG="usb.conf" -DDTC_OVERLAY_FILE="usb.overlay"
And plug Raspberry Pi Pico while holding BOOTSEL button to enter boot mode. Wait. It’s not mounted where expected. Because XServer with KDE Plasma is not running, automatic disk mounting does not work. Manual way is
1
2
3
4
5
6
7
8
9
10
11
12
13
14
(.venv) [pavel@marten -=- ~/zephyrproject/my_projects/hello_world]$ udisksctl mount -b /dev/sda1
==== AUTHENTICATING FOR org.freedesktop.udisks2.filesystem-mount ====
Authentication is required to mount RPI RP2 (/dev/sda1)
Authenticating as: Pavel Perina (pavel)
Password:
==== AUTHENTICATION COMPLETE ====
Mounted /dev/sda1 at /run/media/pavel/RPI-RP2

(.venv) [pavel@marten -=- ~/zephyrproject/my_projects/hello_world]$ cp build/zephyr/zephyr.uf2 /run/media/pavel/RPI-RP2
(.venv) [pavel@marten -=- ~/zephyrproject/my_projects/hello_world]$ mpremote a1
Connected to MicroPython at /dev/ttyACM1
Use Ctrl-] or Ctrl-x to exit this shell
*** Booting Zephyr OS build v4.1.0-5582-g2c5c0e24e8fd ***
Hello world
For XIAO-RP2040 it’s the same. Just to enter bootmode press RESET button while holding BOOT button. And change line to west build -p -b rpi_pico . -- -DOVERLAY_CONFIG="usb.conf" -DDTC_OVERLAY_FILE="usb.overlay". This board has even MicroPython compatible with original Raspberry Pi Pico.
Difference from official sample is that we did not touch source code, we do not wait to serial connection and USB console is initialized at boot time and holds buffer of limited size. This allows as to build program with USB only for Raspberry Pi Pico.
Solution 2: Command line parameters (superior)
Instead of following some youtube video and making difficult overlays files, I learned a new trick later:
1
west build -p -b xiao_rp2040 -S cdc-acm-console -- -DCONFIG_USB_DEVICE_INITIALIZE_AT_BOOT=y
Addendum (2025-11-10)
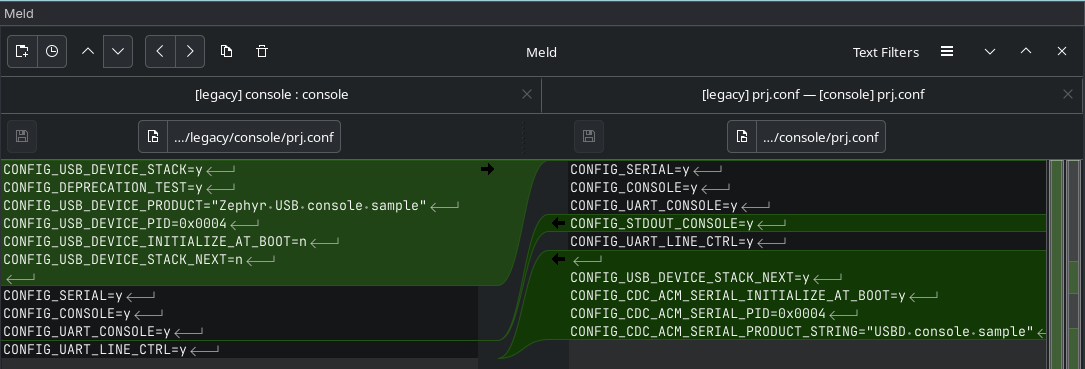
In Zephyr 4.3.0, old USB stack was deprecated. Change in console example is this, but cdc-acm-console was not updated (yet).
Final words
This article should have been longer and basically contain few code snippets. But due to various problems with Raspberry Pi Pico (console output, I2C setup) I decided to split it and gradually continue.
Lesson learned
- automount does not work ->
udisksctl mount -b /dev/sda1orsda - usb-serial not configured by default -> see solution 2
