ENG | Raspberry Pi Pico and C++, Getting Started
There was already article like that introducing Raspberry Pi Pico and MicroPython if you want to know what is Raspberry Pi Pico and what it’s not. But basically it’s like more capable, flexible and faster Arduino, but cheaper. Well, downside is power consumption and not so large ecosystem. And it’s a microcontroller, not a computer.
This article describes how to set it up using Visual Studio Code on both Windows and Linux and expects some familiarity with it.
Motivation
While C++ has a disadvantage in inconvenient firmware upload compared to MicroPython, it offers several compelling benefits, such as at least two orders of magnitude faster execution speed, real-time signal processing, faster sensor sampling, smaller memory footprint, and DMA data transfers.
Steps
VS Code Plugin install
Preferably do this with fast, free internet connection and at least five gigabytes of free disk space. Installation can take about five to ten minutes. Installing plugin itself is fast, but once you create first project for a given platform, it takes time to download and install all tools to build application, such as compiler.
- On Linux, install dependecies: python3 git tar build-essentials or similar package with build tools
- Install visual code extension
Raspberry Pi Pico(id:raspberry-pi.raspberry-pi-pico). Plugin description is pointing to Getting started. It installs other extensions such as Cortex-Debug, debug-tracker-vscode, MemoryView, Peripheral Viewer, RTOS Views, Serial Monitor and possibly C/C++. Python and CMakeTools (I had these installed already). It addsRaspberry Pi Pico Projecticon to the left sidebar. Curiously, it has MicroPython support as well.
Create new project
- Click on
New C/C++ Project - Fill-in settings and click
Create
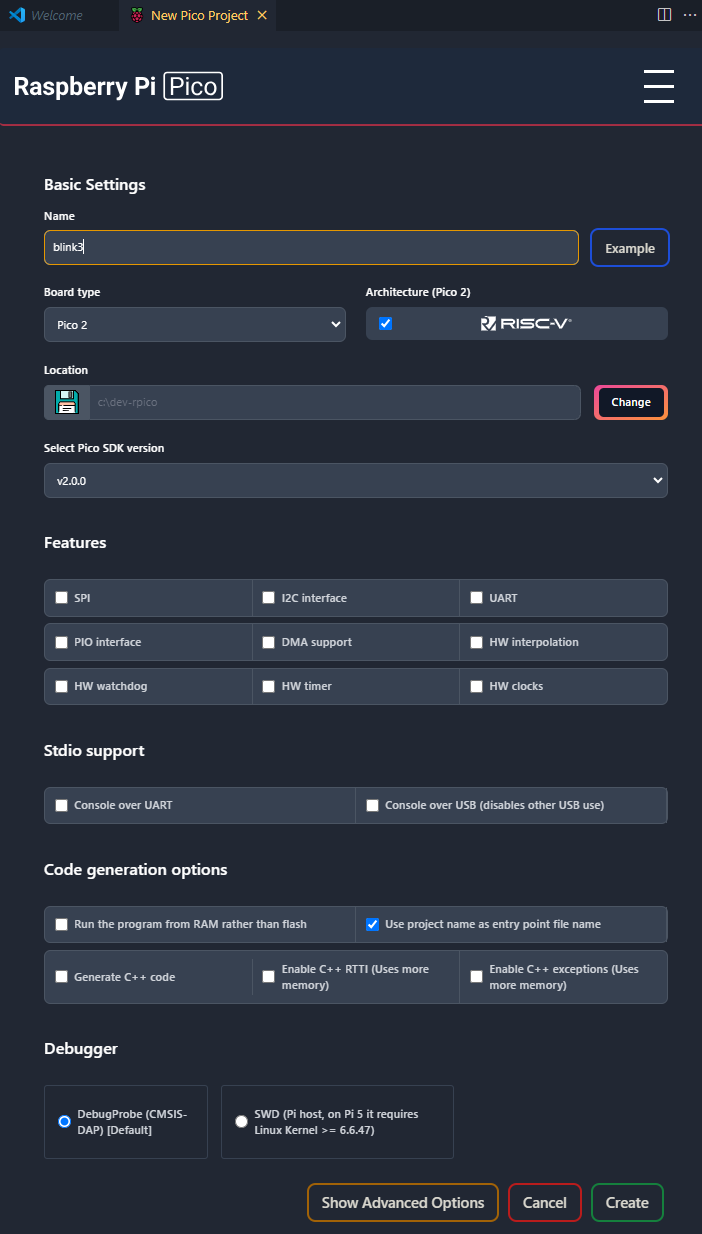 Project settings for Pico 2 using RISC-V core
 - Project will be created even with some blink example using the following code
1
2
3
4
5
6
7
8
9
10
11
12
13
14
15
#include <stdio.h>
#include "pico/stdlib.h"

const unsigned int LED_PIN = 25;

int main() {
    gpio_init(LED_PIN);
    gpio_set_dir(LED_PIN, GPIO_OUT);
    while(true) {
        gpio_put(LED_PIN, 1);
        sleep_ms(20);
        gpio_put(LED_PIN, 0);
        sleep_ms(980);
    }
}
Run project
- Now (unplug and) plug Raspberry Pi Pico to your computer while holding
BOOTSELbutton. Raspberry Pi Pico should appear as USB drive. This soon becomes boring. - On the status panel in Visual Studio Code, press
Run.
Summary
That’s all for the first program. Question is how to learn various APIs, I guess from examples. First project will be likely a thermometer, I2C scanner or similar. But with inconveniece of project upload, I might stick to MicroPython for projects that do not require real-time data processing.
Also, question is what functionality is provided by Pico C++ library and what is provided for example by Zephyr OS or FreeRTOS. At the moment, I don’t know the answer. These are not true operating systems, but rather something that allows interfacing hardware and maybe some multiplatform development.
Addendum
Installing Zephyr on Windows is not fun, it takes roughly 90 minutes (older notebook) and occupies about 15GB of disk space. By default it includes all supported platforms. Also I’m not sure if all hardware features such as power management and programmable IO are exposed via API, I suppose they are not. FreeRTOS may have have better support (?), but official SDK seems to be the best option. (This might be outdated)
Addendum (Autumn 2025)
In the end I never used PicoSDK or FreeRTOS. But search this blog for zephyr RTOS, it’s quite useable with Pico, although it requires some learning and research. Now it seems that even Pico 2W is fully supported.