ENG | Setting Up Claude Code in a Podman Container
Setting Up an Isolated Dev Environment with Podman and Claude Code
Motivation
(Dear Diary). I paid $20 to Anthropic, cause I wanted to see what are differences between free and paid tier today. Three years ago it was access to new models and early models were good mostly for fun. Difference between ChatGPT3.5 and ChatGPT 4.0 was huge. Also free models were slow. Claude Haiku was basically useless, while Opus was ok. Two years ago free models were good enough (Claude Haiku was not and Sonnet was not accessible during high load) so there was no strong motivation to pay. Limit was only low message count per time especially on Claude, but there is also ChatGPT, Qwen, Grok, …
I was surprised that Claude wrote some resource management system and asynchronous data fetch, consisting of cache, data fetch queue (load/compute), worker thread (processes queue, moves result to cache) so I decided they deserve some money and I wanted to try Claude Code anyways.
First difference I noticed is that paid Claude Opus can create multiple files and compile and run them in a container. I just tried to have conversation how to write gomoku with client-server architecture and was surprised it created whole project including make file. Only problem was that when I downloaded 10 files, directory structure was lost. But wow. This was totally unexpected.
I decided to run Claude Code in a container so it can’t access my host filesystem. Here’s how I set it up with Podman and openSUSE Leap. Maybe it’s not a typical workflow.
Tip: If you work on Windows, great alternative to containers is WSL (Windows Subsystem for Linux)
Side note: Last time I wanted to run something in isolation, I created “temporary” user, set weak password, forgot to disallow ssh login and many months later I found Outlaw botnet running on my mini server. Not only does it consume electricity, but it has consequences - your IP appears in various black lists, your provider and DNS servers start throttling internet traffic so significantly you will notice (also fan noise is noticeable)
Building and setting up container
First we need some distribution of our choice from Docker Hub:
| Link | Tag |
|---|---|
| https://hub.docker.com/r/opensuse/leap | 16.0 |
| https://hub.docker.com/_/debian | bookworm |
| https://hub.docker.com/_/fedora | 43 |
I chose openSuse Leap, because I’m familiar with openSuse and Fedora and Leap has less updates. CentOS and RockyLinux do not seem to have up-to-date images on docker hub.
Preparing Dockerfile
Then we need to create Dockerfile. It may start simple:
1
FROM opensuse/leap:16.0
Now we can play with it, try installing stuff to get package names right and so on, before proceeding to creating Dockerfile which automates setup.
Useful, very basic commands are
1
2
3
4
5
6
7
8
9
10
11
12
13
14
15
16
# Build image `dev-claude-ai` from Dockerfile in the current directory
podman build -t dev-claude-ai .
# Run shell inside docker container, remove container when not in use
podman run -it --rm dev-claude-ai:latest
# Same, but as root
podman run -it --rm --user root dev-claude-ai:latest
# Create container `claude-dev` once, mount user's folder, preserve userid (both system and container have UID=1000)
# `:Z` flag is a must for SELinux, `--userns=keep-id` for UID mapping (not used in final setup)
podman run -it --name claude-dev -v ~/claude:/home/claude/projects:Z --userns=keep-id dev-claude-ai-latest
# Reuse container `claude-dev` (unlike image, container holds filesystem changes - but only until image is recreated)
podman start -ai claude-dev

# List images
podman image list
# Prune unused images
podman image prune
After some trial-error with package installation it gets a bit more complicated. The following script uses openSuse Leap 16 as a base, adds user claude, updates packages, installs python and c++ compilers, vim, ripgrep which is dependency of Claude.
Docker file syntax was new to me. Note that every run command creates ‘snapshot’ or ‘filesystem overlay’ so commands are often grouped together. There are leftovers, I did not need Python modules, later I decided to add nasm without rebuilding what was there already, so I added it as a new command. And initially I had some files in user directory already. File iteratively grew as I was trying to create variant of Gomoku (Piškvorky in Czech).
Final version just ended by creating user with user files are stored on volume. During first use, few files such as .bashrc are created on empty volume, then they are preserved. Volume stores changing and persistent data.
I have this file located in docker/claude directory together with some podman compose files and so on, which are in git repository.
1
2
3
4
5
6
7
8
9
10
11
12
13
14
15
16
17
18
19
20
21
22
23
24
FROM opensuse/leap:16.0
#FROM opensuse/leap:latest # This is 15.6
# Avoid interactive prompts
ENV ZYPP_NONINTERACTIVE=1

RUN zypper refresh && \
    zypper update -y && \
    zypper install -y python313 python313-pip clang gcc-c++ cmake make vim ripgrep git openssh gdb strace valgrind perf && \
    zypper install -y gtest benchmark-devel grpc-devel ncurses-devel SDL3-devel && \
    zypper clean -a

RUN useradd -u 1000 claude

# These were added later to support various programs
# zlib-devel conflicts with zlib-ng-compat-devel
RUN zypper install -y nasm fastfetch unzip opencv-devel libzstd-devel liblz4-devel libpng16-devel

#USER claude

#WORKDIR /home/claude

#RUN pip install --upgrade pip && pip install seaborn opencv-python sympy scipy

#RUN curl -fsSL https://claude.ai/install.sh | bash
Compiling and running container
Compiling docker image takes roughly 3-5 minutes on almost 10 years old mini PC with 500mbit download. This is not the first version of Dockerfile, it iteratively grew as I tried to create gomoku/piškvorky using vibe coding. Comments are left for future reference.
1
2
3
4
5
6
7
8
9
10
# Create volume for home directory
podman volume create claude-home
# Go to directory with Dockerfile
cd ~/docker/claude
# Compile image from Dockerfile in current directory
podman build -t dev-claude-ai .
# Run container `claude-dev` using image `dev-claude-ai:latest` as user, mount `claude-home` volume as home.
podman run -it --rm --name claude-dev -v claude-home:/home/claude:Z --userns=keep-id dev-claude-ai:latest
# For experiments as root
# podman run -it --rm --name claude-dev --user root dev-claude-ai:latest
Installing and running Claude in container
This is quite easy: a simple command from Claude Code Documention
1
2
3
4
5
6
7
8
9
10
11
12
# Go home
cd
# Download Claude
curl -fsSL https://claude.ai/install.sh | bash
# Proceed with instructions
echo 'export PATH="$HOME/.local/bin:$PATH"' >> .bashrc
export PATH="$HOME/.local/bin:$PATH"
# Create project directory and enter it
mkdir hello_world
cd hello_world
# Run claude
claude
If session disconnects you may see something like this:
1
2
[pavel@marten -=- ~]$ podman run -it --rm --name claude-dev -v claude-home:/home/claude:Z --userns=keep-id dev-claude-ai:latest
Error: creating container storage: the container name "claude-dev" is already in use by 3b32567f80d107048e34da85211f7107cb32634275ba5e7568bb25d67c2d2ca4. You have to remove that container to be able to reuse that name: that name is already in use, or use --replace to instruct Podman to do so.
Then just type
1
2
# Attach to the existing container (same TTY)
podman attach claude-dev
or maybe
1
2
# Start a second shell session inside the container
podman exec -it claude-dev /bin/bash
To resume claude in project’s directory, type
1
claude --resume
and it let’s you to select from latest sessions.
Image gallery
And now here are some screenshots
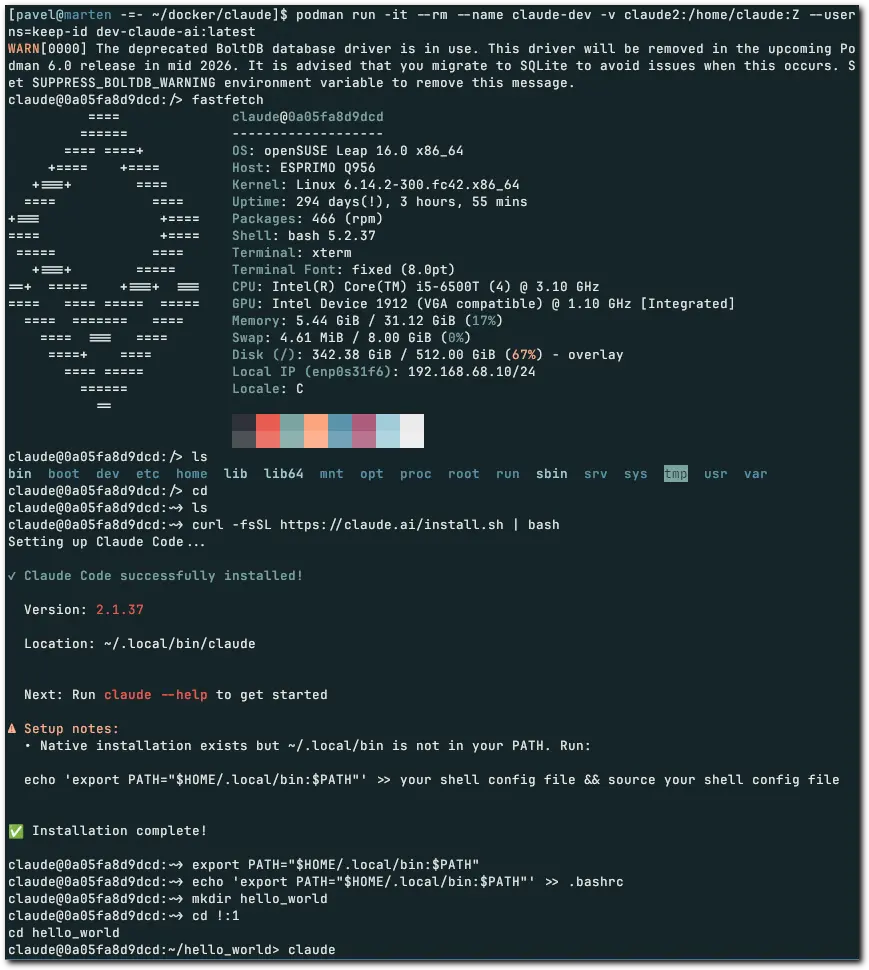 Container preparation
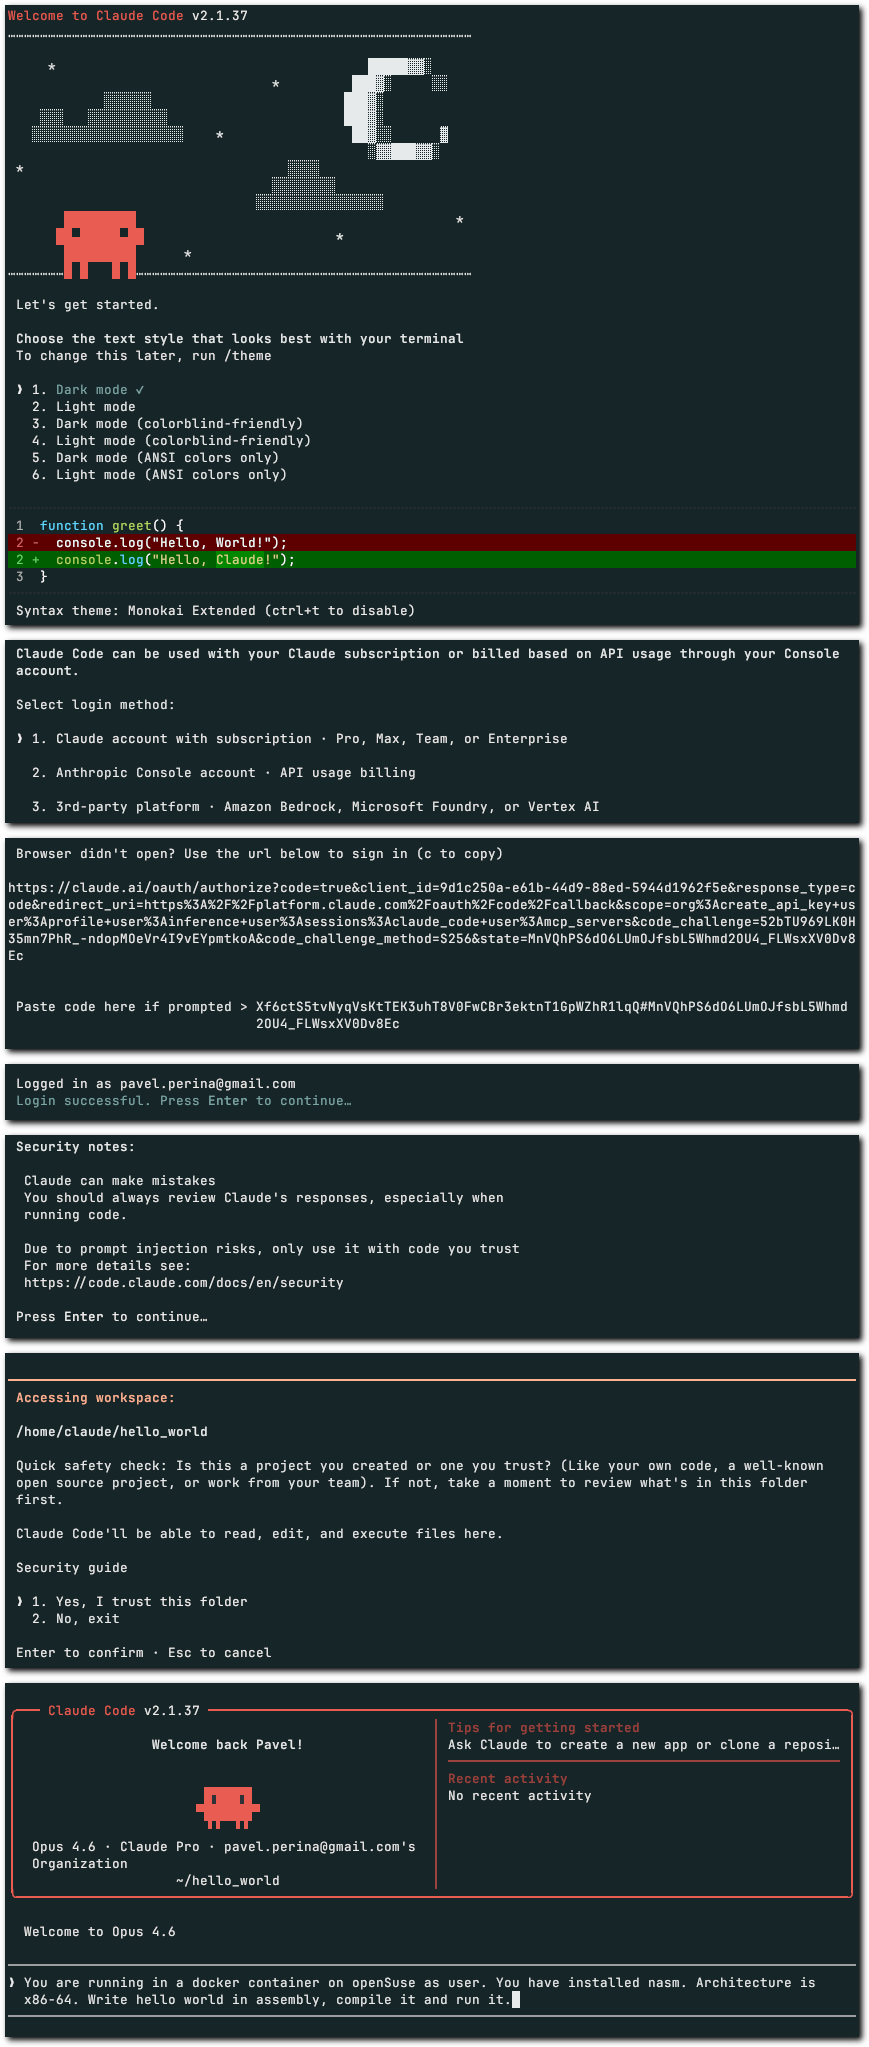 Initialization of Claude code
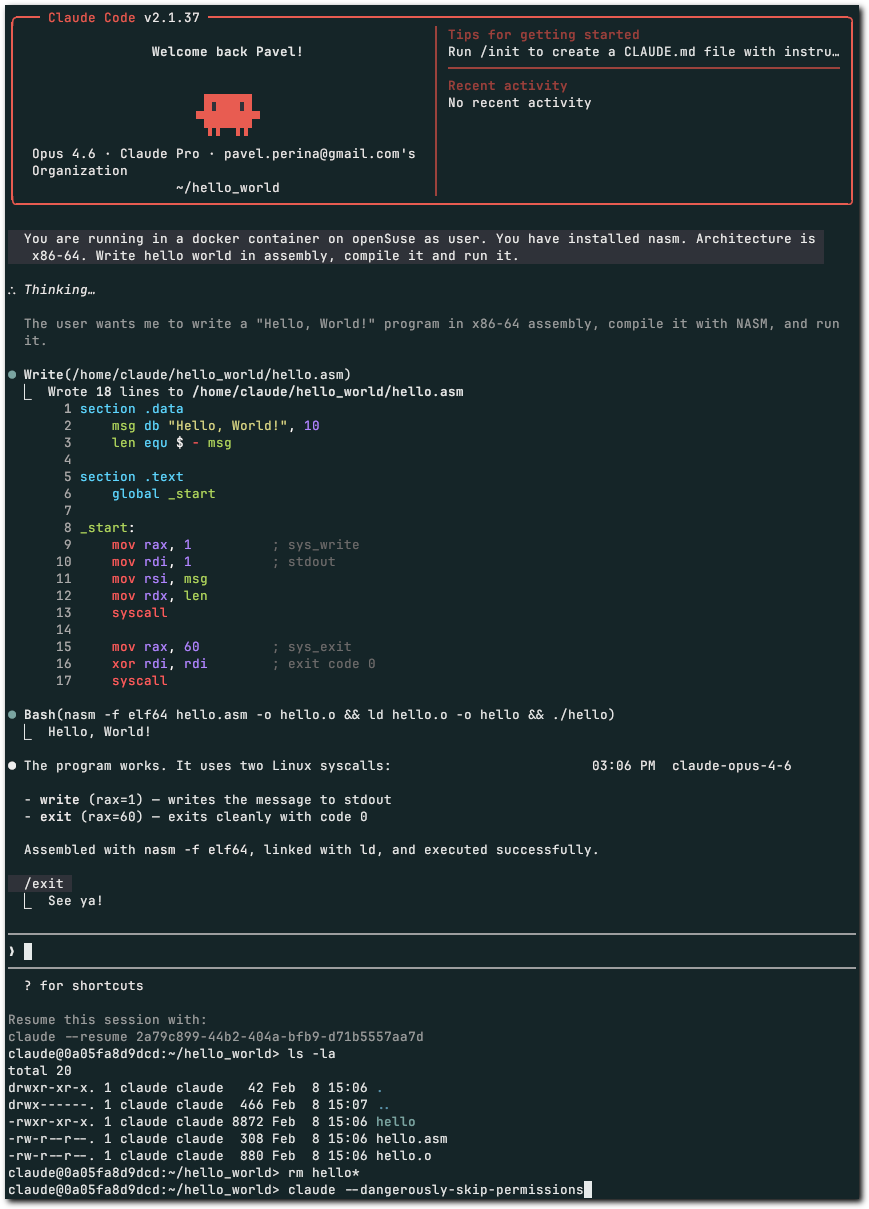 Hello world in assembly
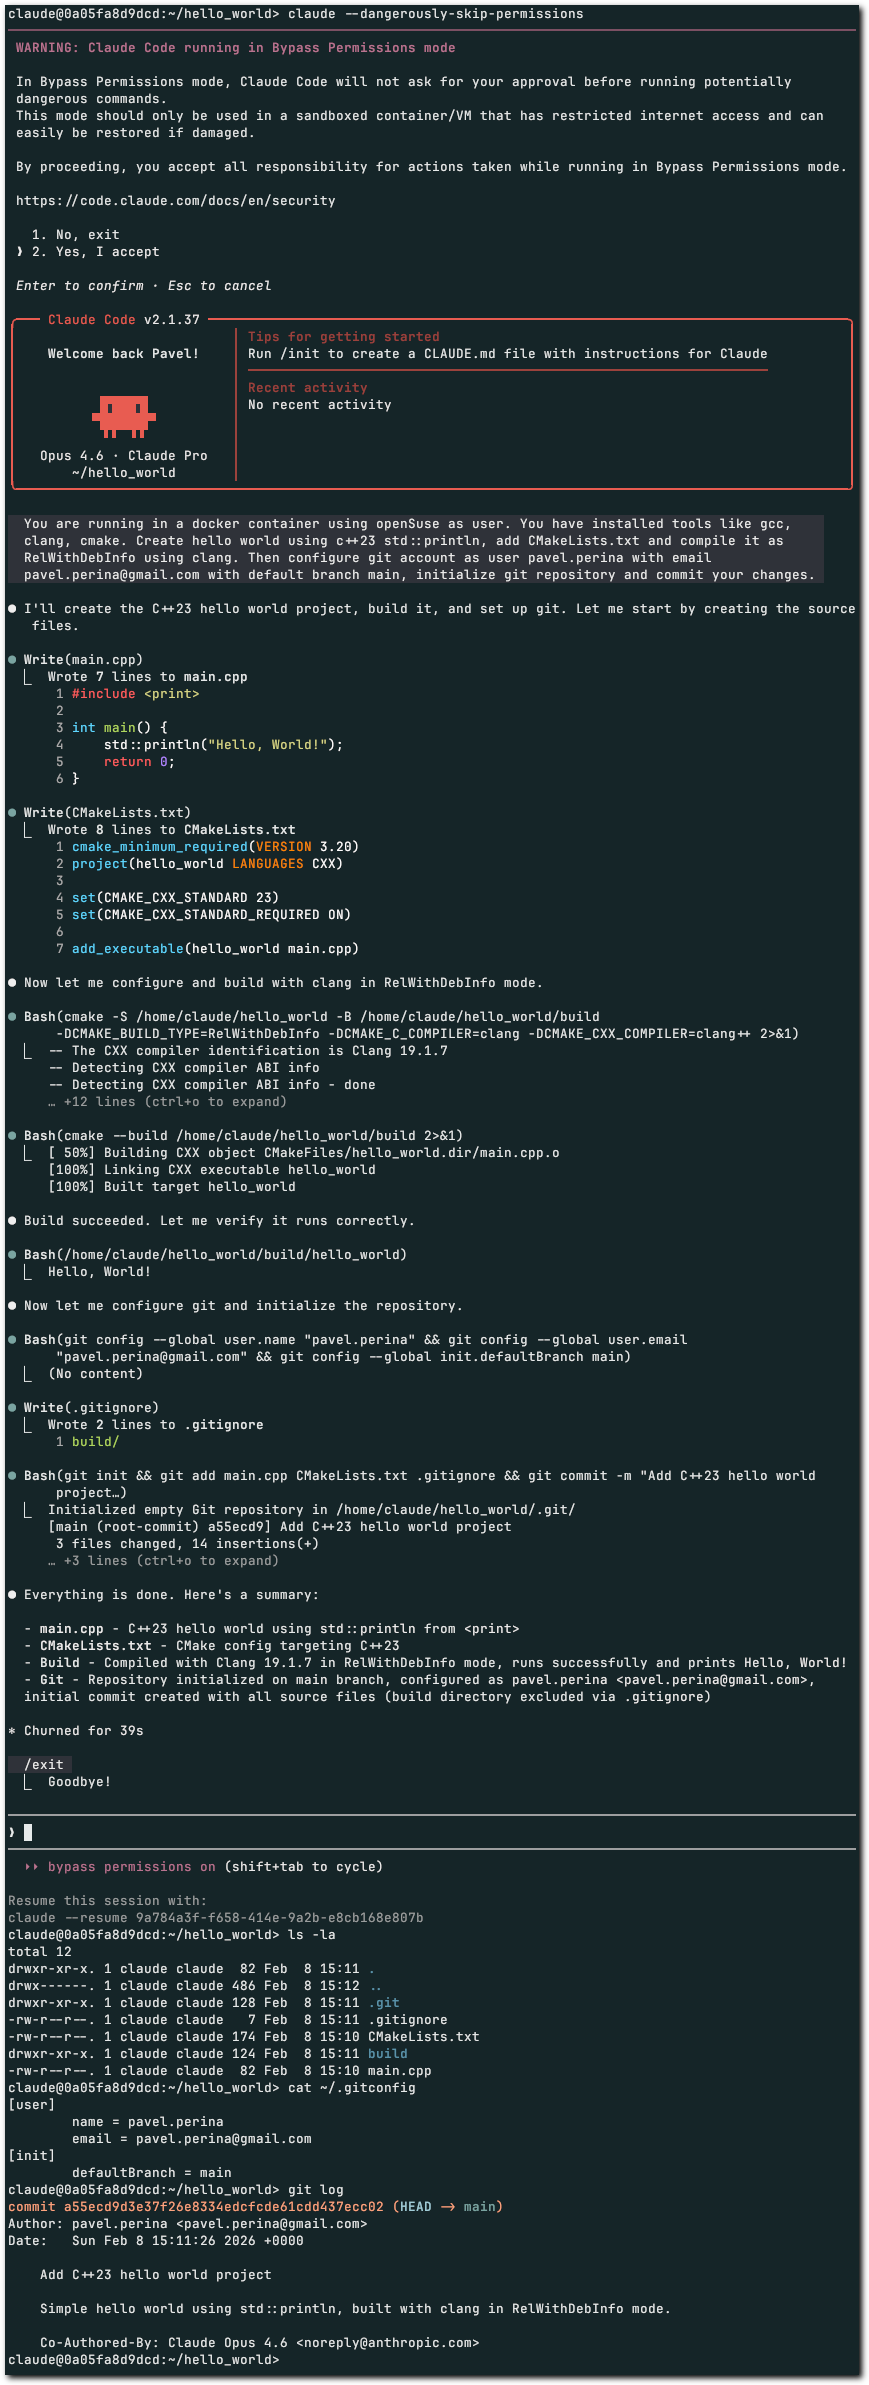 Hello world in C++
Summary
That’s it. Container works, data persists, host filesystem is safe. No regrets about the $20. I learned something new and I haven’t had any surprise botnets this time (yet).
Bad news is that in two evenings, I’ve spent 3/4 of my weekly usage limit.
March update (2026-03-07, addendum)
Do I like this approach? In retrospect it starts being limiting as isolation brings some safety, but it’s also friction. It’s not convenient to copy results (compiled binary, images) back and forth. I guess there are two options. SSH into container or mount directory with source code.
I decided for 2nd option.
To make it worse, when I started, i did not create directory called projects or devel inside /home/claude.
Solution:
- inside container moved all useful projects into
claude-projectsfolder. tar cf claude-projects.tar claude-projectsscp claude-projects.tar [email protected]:~/tmp- leave container
tar xf claude-projects.tarpodman run -it --rm --name claude-dev -v claude-home:/home/claude:Z -v ~/claude-projects:/home/claude/projects --userns=keep-id dev-claude-ai:latest, note that directory must start with/or~/otherwise it’s considered name of volume
Hack:
cd ~/.claude/projectscp -R -- -home-claude-pano-merge -home-claude-projects-pano-merge---is used to stop parameters parsing, because path start with minus
Then, it might be minor annoyance to have different distribution inside container. You link something against OpenCV 4.10, copy it elsewhere and suddenly there is OpenCV 4.11.
Bashrc file as of 2026-03-09:
1
2
3
4
5
6
test -s ~/.alias && . ~/.alias || true
export PATH="$HOME/.local/bin:$PATH"
export EMSDK_QUIET=1
export PS1="\e[37;1m[\e[33mclaude \e[37;1m-=- \e[33;1m\w\e[37;1m] \e[0m"
source "/home/claude/emsdk/emsdk_env.sh"
. "$HOME/.cargo/env"