ENG | Nighttime Photography: Perseids
For night photography enthusiasts, here’s a consolidated guide from my experience with the Perseids aplicable to nighttime photography in general.
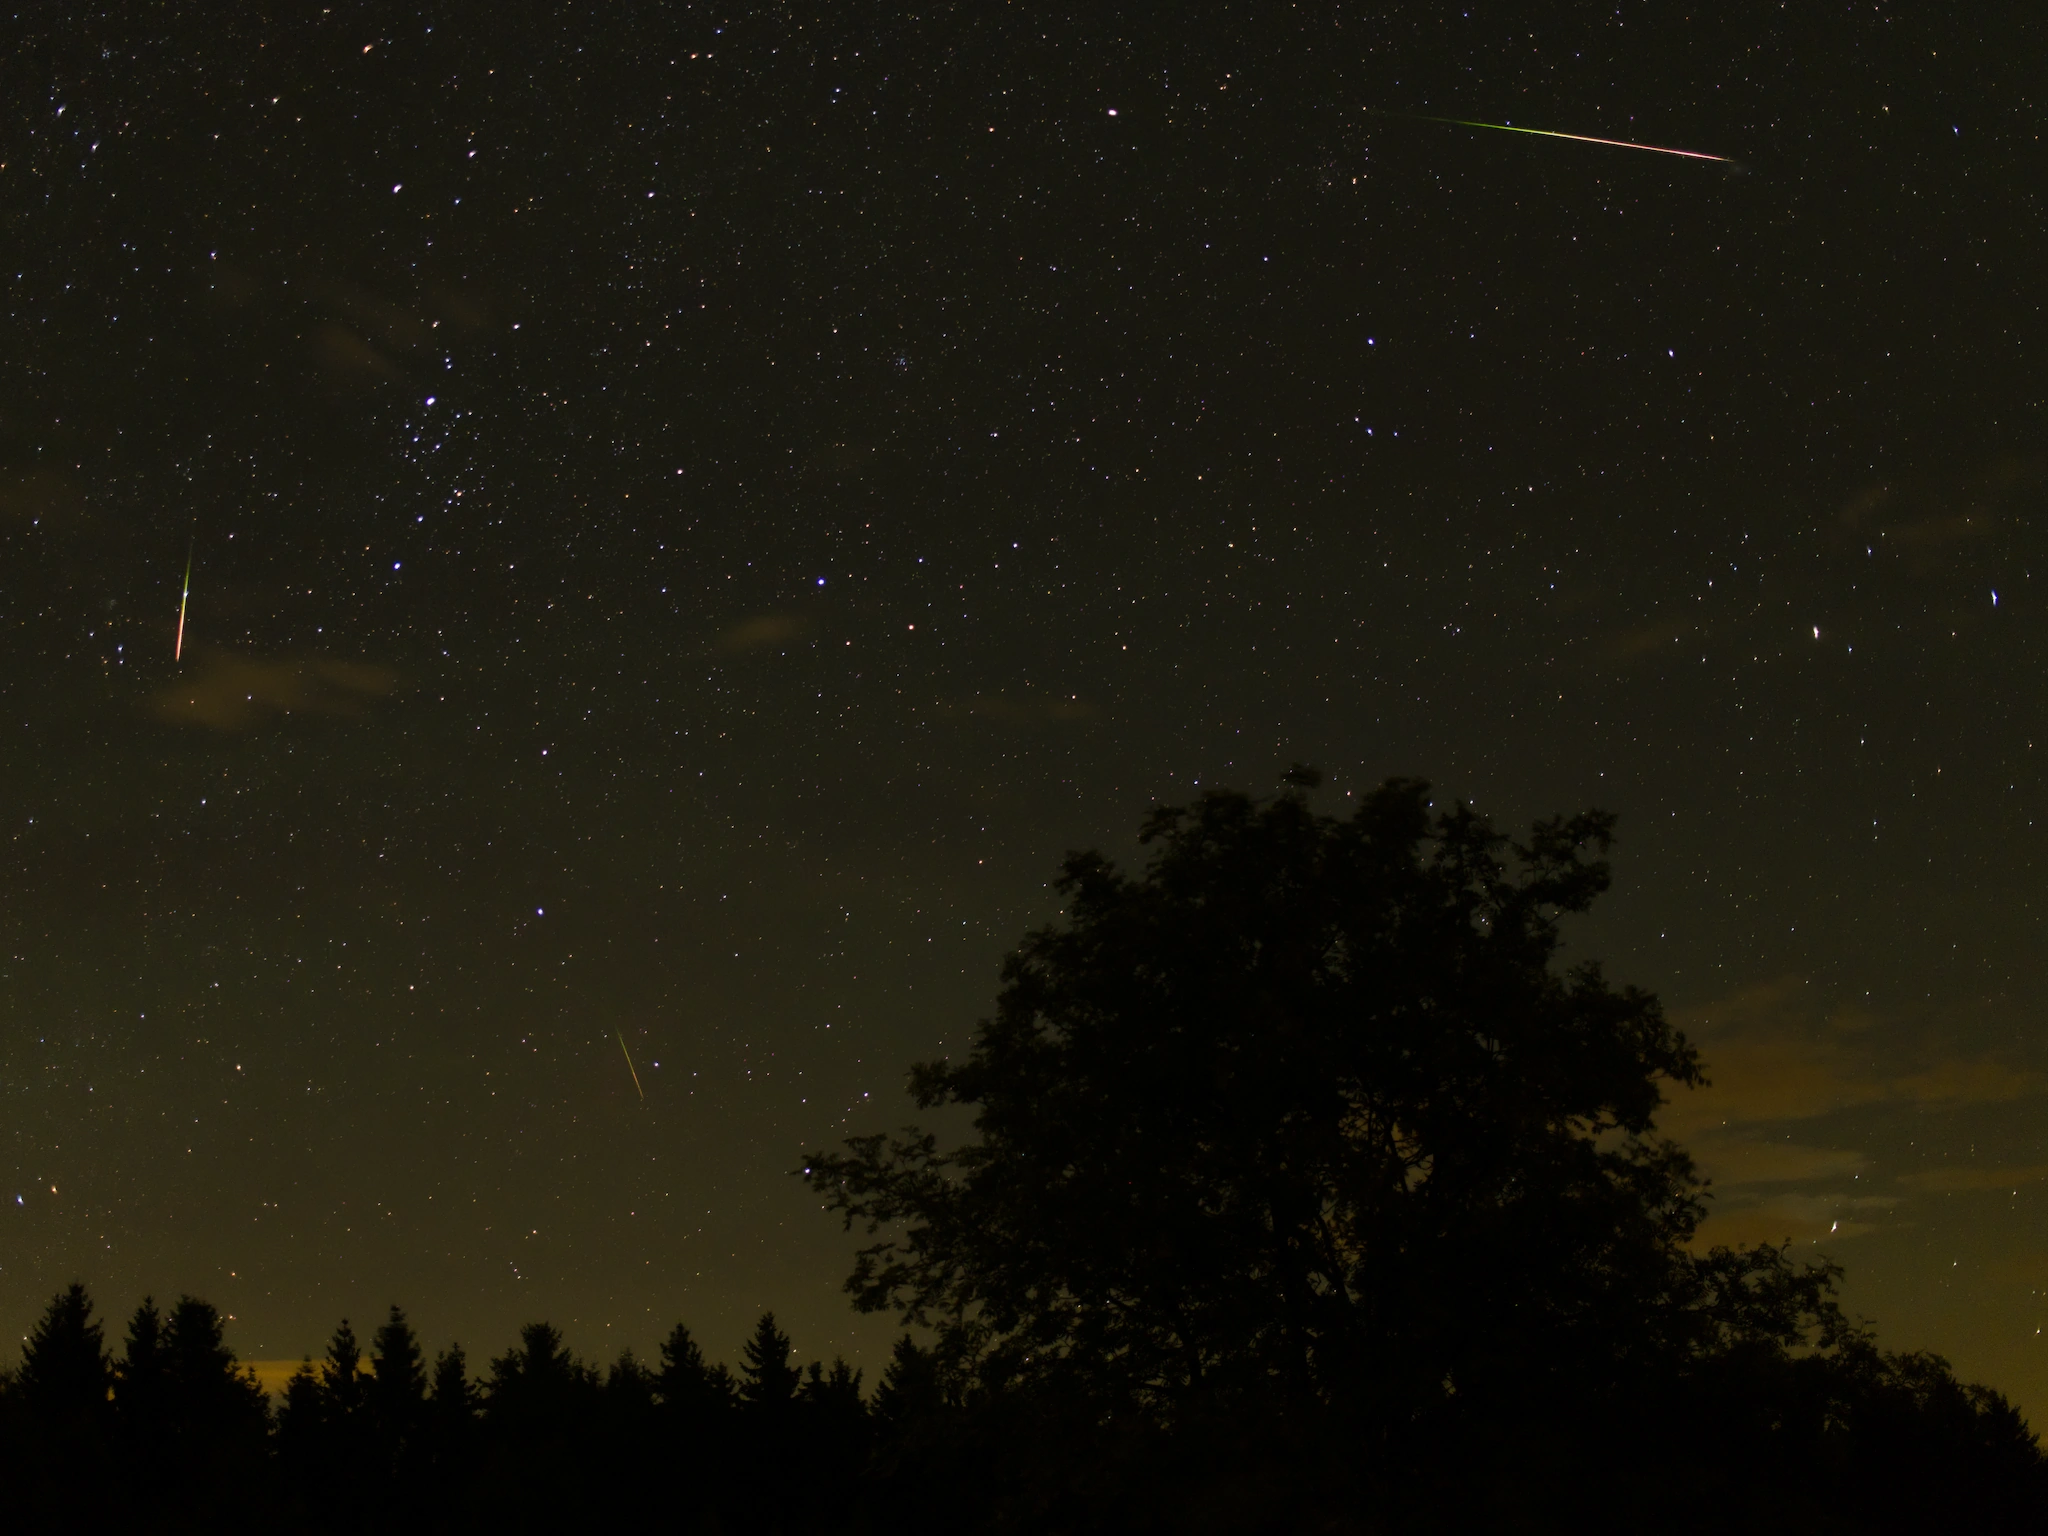 Captured three Perseids from 110 shots with a 10s exposure at ISO 1600, F2.0.
Equipment list
This equipment is the same as for any nighttime photography, such as Noctilucent Clouds (NLC) timelapse. Fireworks require telephoto lens and aperture is not important.
- Camera
- Wide lens (if available)
- SD card with enough free space
- Fully charged camera battery
- Sturdy tripod and quick release plate
- Headlamp (preferably red light or firefly mode) + spare battery
- A seating mat
- A lens hood (optional, against dew)
Scouting the Ideal Location
- Consider the foreground. Use Stellarium mobile app to find location of Perseus constellation roughly two hours after sunset.
- Opt for areas with minimal light pollution.
Where to find Perseids and what are the chances of successful photo?
In the Czech Republic, find Perseus below Cassiopea during late evenings, NE direction. The radiant sits between Cassiopea’s leftmost star and Mirfak and a little bit to the left. Star Mirfak is one of the larger group of visible stars, forming “shield” of Perseus.
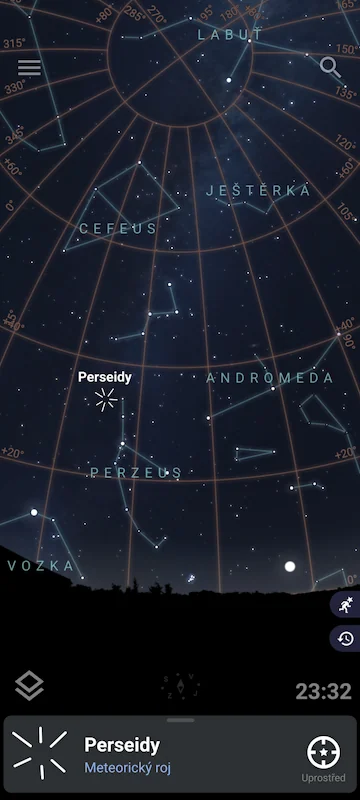 Location in Stellarium mobile application
Freqency is roughly one meteroid per minute. With 35mm lens covering barely 1/10 of sky, part of the photo below horizon and camera not exposing sky for 1/3 to 1/6 of time … good luck and have fun! You may capture one event per ten minutes or less.
Camera settings
Also these settings are good starting point for any night time photography. Fireworks have different settings and it’s better to use mobile phone as a remote shutter.
- Manual focus at infinity 🏔, verify
- Iso 1600 (adjustable based on light polution)
- F2 (lower is better)
- Long exposure noise reduction off
- Image stabilizer off
- Roughly 8 to 10 seconds time for 35mm lens, see a discusion about 500 Rule
- 12s or 15s interval shooting (test how fast camera can process and save files)
- Set WB daylight 🔆 (fixed)
- RAW format is already set, right?
After experience from 2023 it’s better to take vertical photos. Reason? Less horizon and less light polution near horizon means larger useable area. Taking pictures higher above horizon and stitching panorama can help too. Next time.
These settings are just a starting point, but it’s good to know limitation of your camera and lenses, which is shown in a sequel to this article in Fujifilm X100V and Panasonic G80 comparison. See link in the end.
On Fujifilm X100V:
- Switch to manual focus: Use the left slider in the upward position and focus using the ring on the lens.
- Set the aperture: Adjust to 2 on the lens.
- Adjust ISO: Pull the top dial to set ISO 1600.
- Set time: Push the top dial, select time T, and adjust time using the rear dial (SS10”).
- Set WB: Q -> WB -> 🔆
- Adjust screen brightness (optional): Q -> 🔆
- Configure long exposure noise reduction: [Menu] -> IQ 3/3 -> Long exposure NR: OFF.
- Set interval timer shooting: [Menu] -> 📷 1/3 -> Interval timer shooting -> Interval: 0h 0m 12s -> Start waiting time: 0h 0m later -> [OK].
Post-Shooting Activities
Dark Frames for Noise Reduction: After your session, capture a few photos with identical settings and the lens cap on. These images will serve as dark frames, helping to reduce noise during post-processing.
Light Painting: Experiment with some light painting techniques. This can add an artistic touch to your shots. Depending on your preference, you can choose to include or exclude these effects in your final images.
Panorama Capture: If you’re interested in a broader view of the night sky or your surroundings, consider capturing a panorama. This technique stitches multiple photos together to create a wide, comprehensive image. You may change ISO to 6400 and capture milky way. Phone application for a remote shutter is useful.
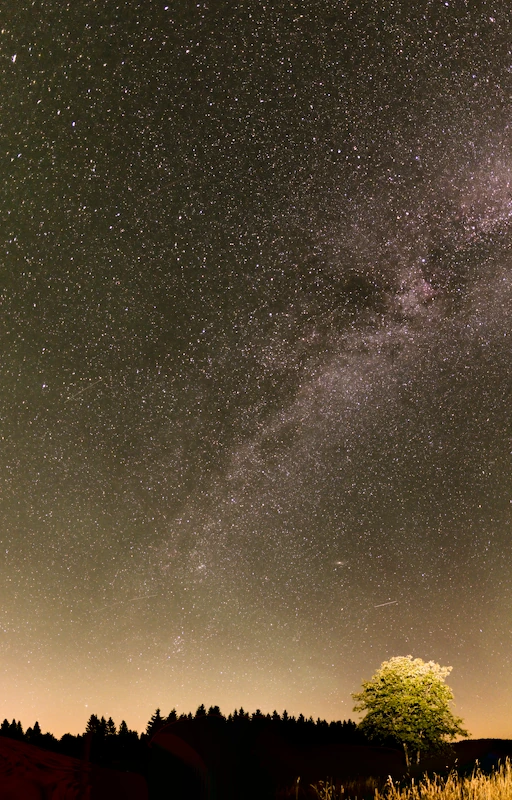 Milky Way panorama, Fujifilm X100V F:2, ISO:6400, SS:10s
Software
RAW file development
I use RawTherapee to convert RAW files into images. It’s helpful for adjusting noise reduction, EV, and white balance. Set a darkframe (from the directory in global preferences) to remove hot pixels. After that, copy & paste settings to other photos and convert them into TIFF files.
Few settings needed to be changed:
- EV +0.33
- Noise reduction: on, luminance 46
- Preprocessing: hot&dead pixel filter
Merging Images
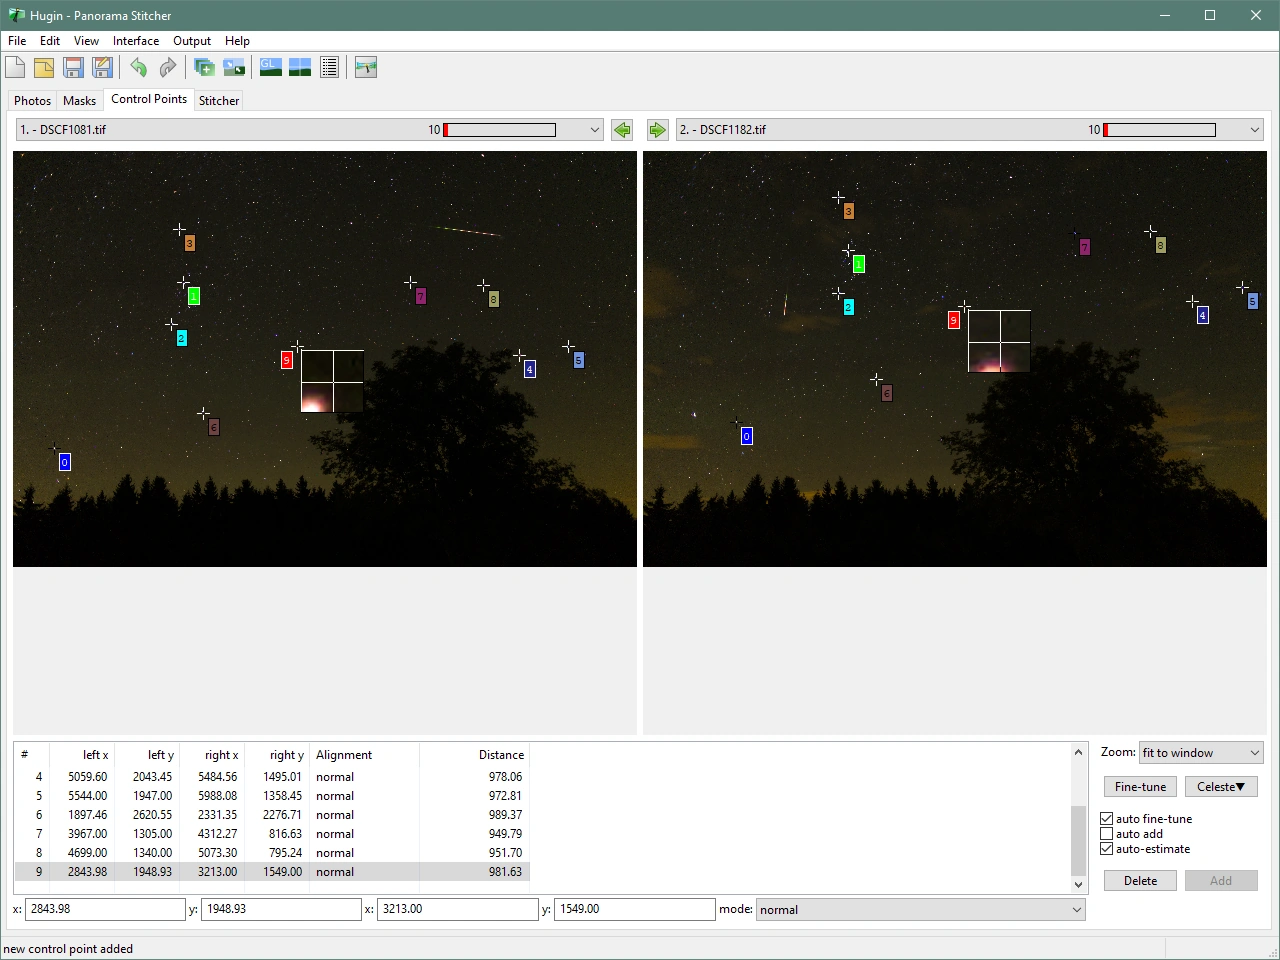
My beloved software for merging photos (e.g. panoramas) is Hugin. While sometimes it can be a bit of a challenge, the process here is quite straightforward:
- Manually select like 10 stars on each pair of photos.
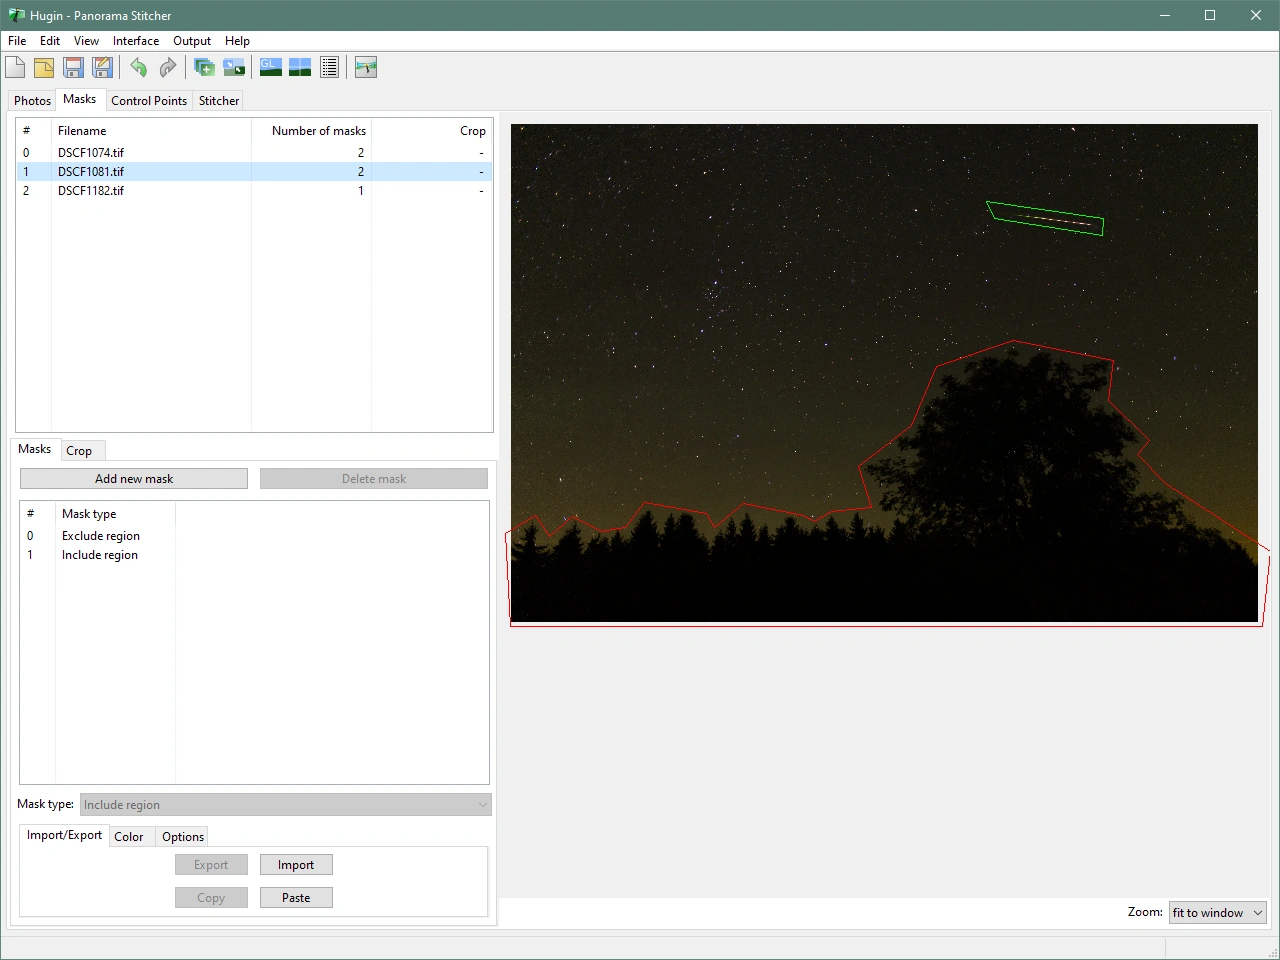
- On every photo, except the last one, select the horizon and choose
exclude. - For all photos, select meteors and choose ‘include’ (this area will be excluded from all other photos).
- Ensure no area is excluded across all photos.
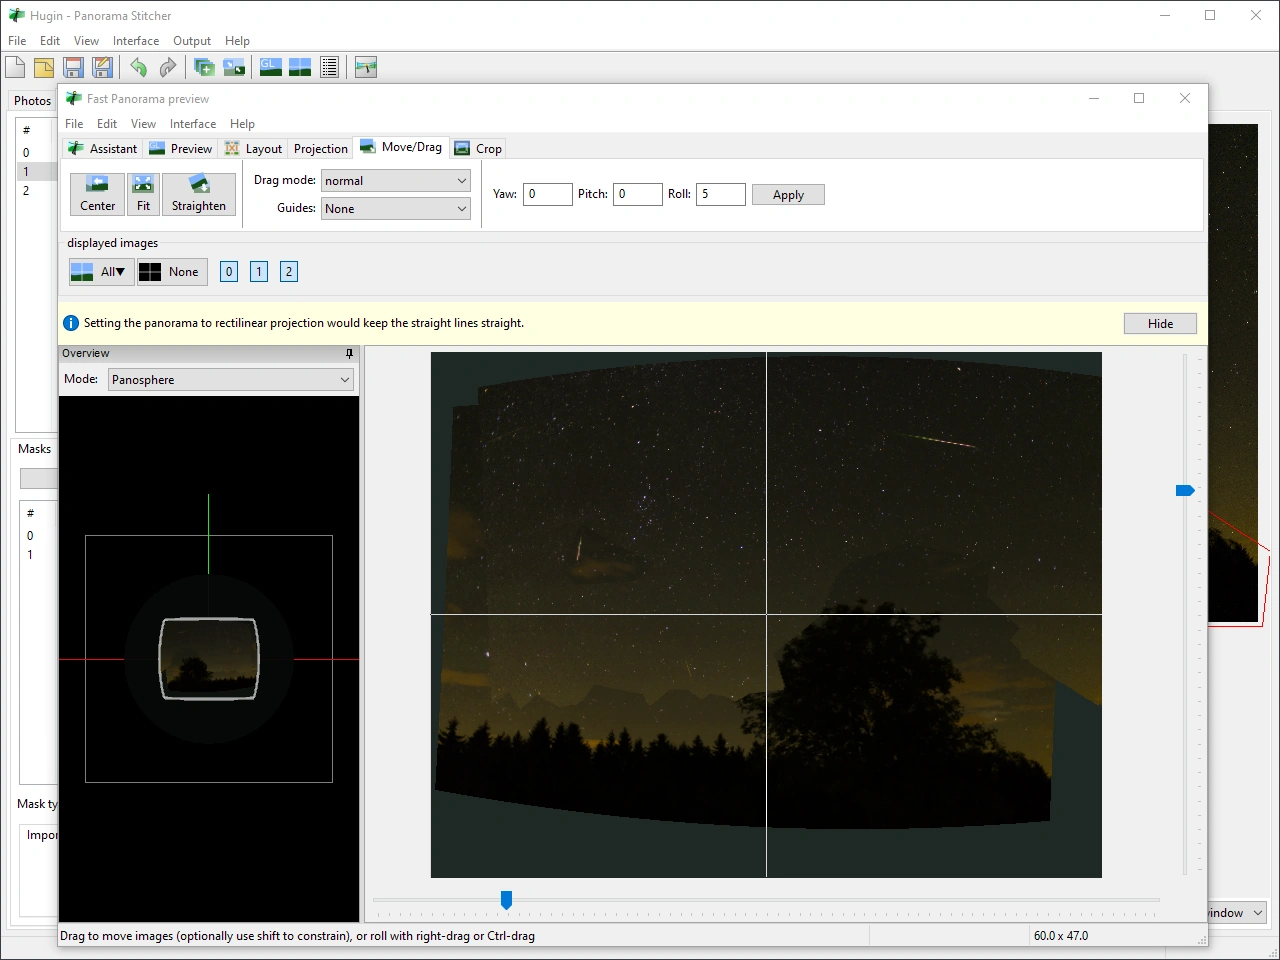
As the sky moves upwards from the horizon, use the last photo as a reference to capture the maximum sky in the result.
Hugin Step-by-Step Process
While this isn’t exactly a linear guide, start by opening Hugin and importing photos.
Select control points, focusing only on stars. Aim for even sky coverage so no area gets prioritized during optimization. Aim to select approximately 10 stars.
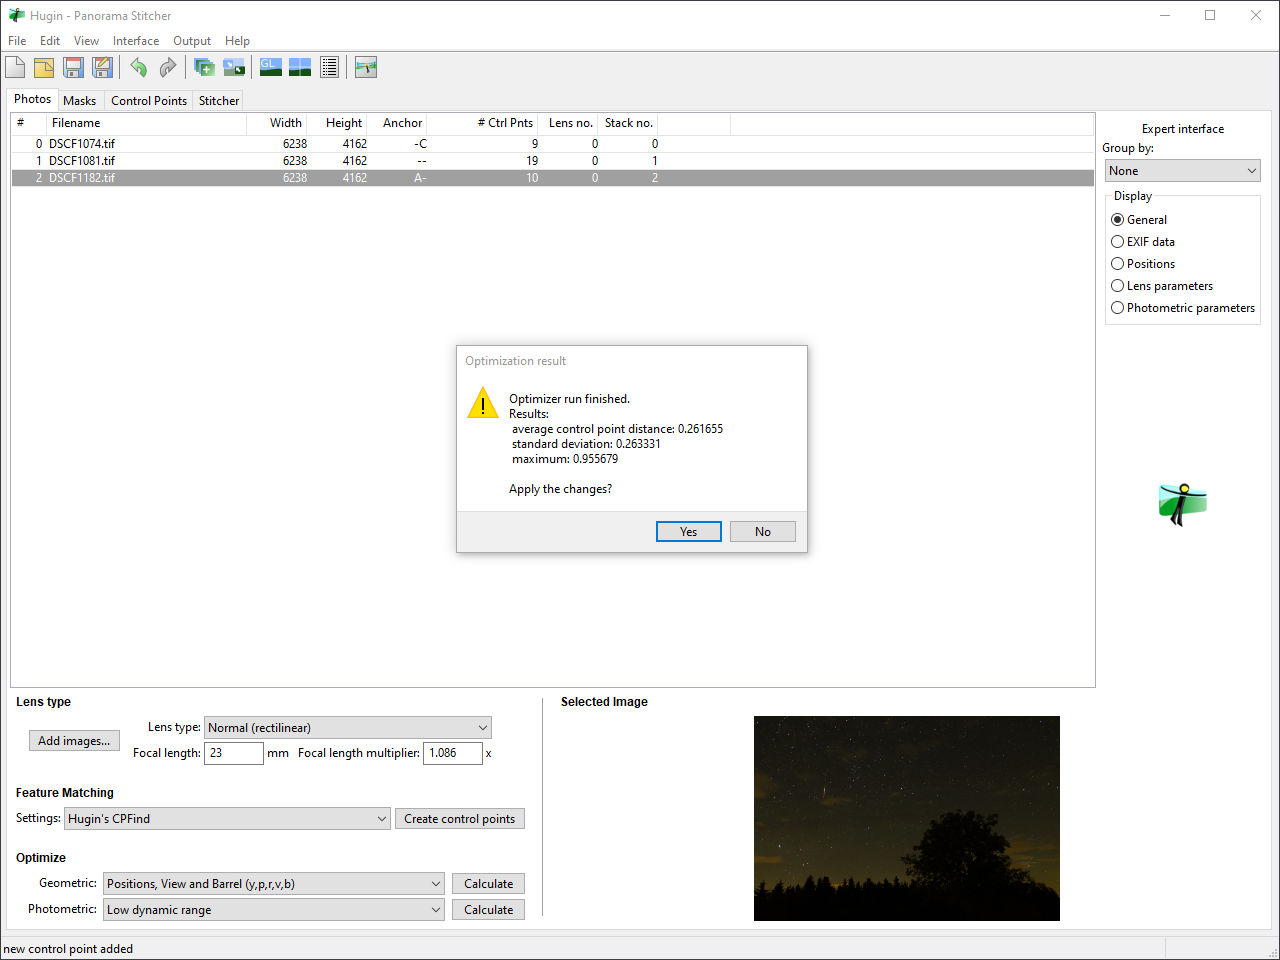
Use the right-click option to set the last photo as an anchor. Then optimize position and lens distortion (yaw, pitch, roll, and barrel should suffice).
Launch the fast preview (icon labeled GL).

In the move tab, hit the
CenterandFitbuttons. Experiment with the roll option (adjust by small angles, pressingApplymultiple times).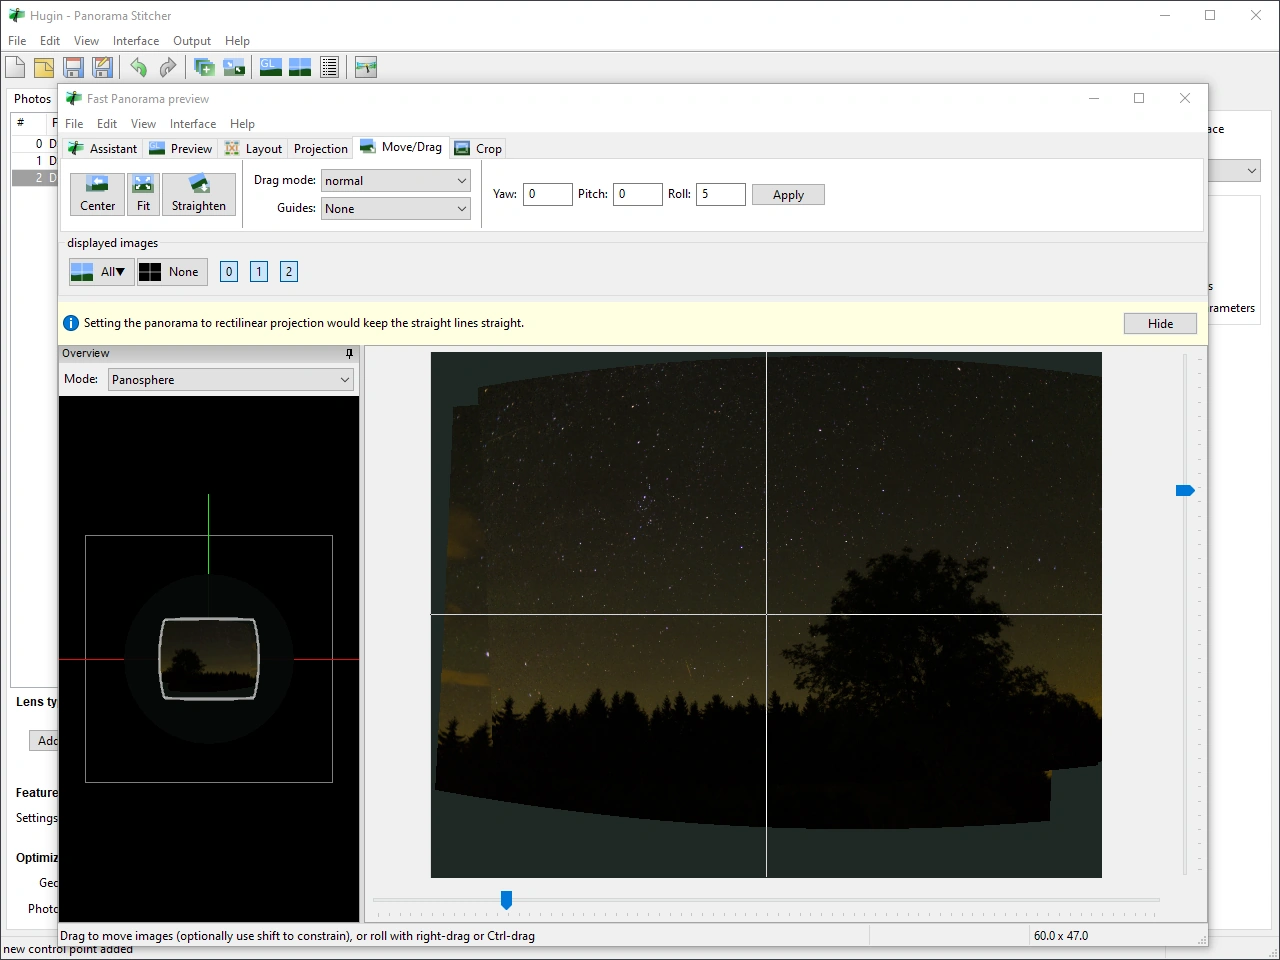
Once satisfied, go back to the mask tab. Exclude the horizon for every photo except the last, and include meteors.
You can now revisit the preview.
In the last tab,
Calculate field of view,Calculate optimal size,Fit to crop image(autocrop). Save the project. Proceed toStitchthe panorama. It asks for prefix (of output filename and temporary files), enter unique name of output file.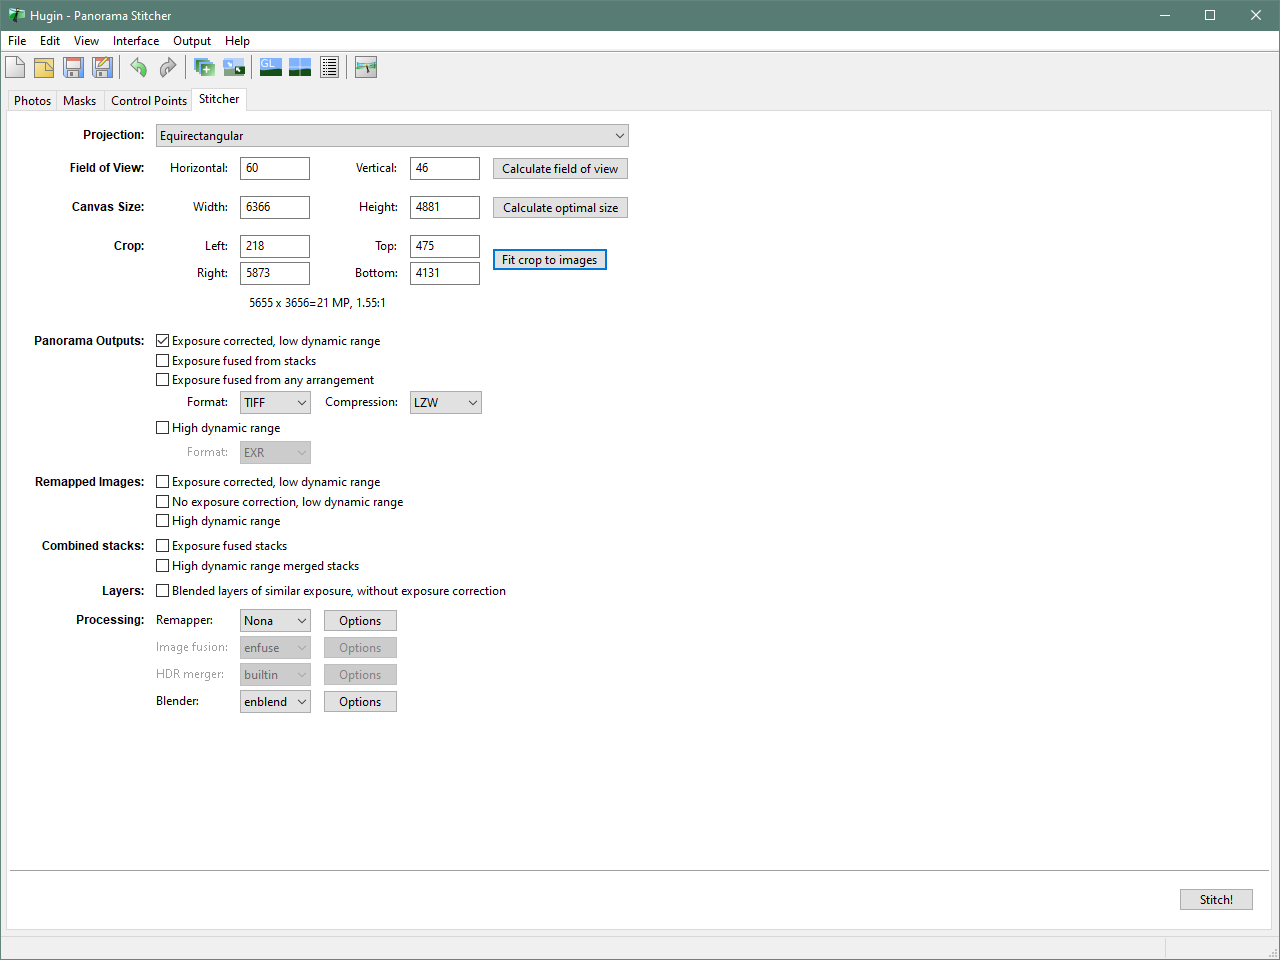
Review the outcome. If it doesn’t meet your expectations, revisit the control points step. You can display the control points list (using the second icon from the right) and fine-tune those with highest distance. Try re-optimizing, possibly adjusting the centering and crop, and attempt stitching once more.
Milky way panorama was much harder, because it required finding suitable projection. Automatic keypoint detection and matching took like 15 minutes and returned some incorrect pairs. Also program trying to find seamless stitches failed (solved by removing excessive photo and redefining mask of a tree and grass)
Summary
Capturing the beauty of the night sky, especially during spectacular events like the Perseids meteor shower, is both challenging and rewarding. We’ve walked through the essentials: from scouting the perfect location and setting up your equipment, to post-processing using software like RawTherapee and Hugin.
Best wishes on your night photography ventures. Happy shooting!
Addendum
There’s more to explore. Some intriguing questions arose while I was writing this article, delving deeper into the technical intricacies of night sky photography. For those hungry for more insights and details, continue to the sequel