ENG | Cloudflare: A Configuration Guide. Tunnels and Dynamic DNS
This article serves as a guide to the world of Cloudflare’s services. It’s primarily designed for those who are just getting started with this tool and are considering whether to use it. We’ll introduce key services like tunneling and DNS, and discuss both the benefits and considerations to bear in mind. Regardless of whether you’re a novice to the platform or have only a peripheral understanding, this resource will provide valuable insights for your decision-making process.
This article was translated from Czech version using ChatGPT on 2023-07-05. Some longer sentences may sound weird in English.
Motivation
You could certainly manage without Cloudflare. Nonetheless, leveraging its services can alleviate a number of inconveniences, adding a layer of comfort and security to your configuration. Among its notable features is the reverse tunnel for HTTPS traffic. This setup establishes a connection from the container straight to Cloudflare, bypassing multiple links between your web server and the outside world. As a result, only two key components are left on the target server: the ‘cloudflared’ service and your web server. Moreover, Cloudflare offers the unique feature of accessing SSH via a web interface, adding even more value to its services.
What you won’t need
- Public IP address
- No-ip and dynamic DNS (but we need our own top level domain, which is about 150CZK/year for .cz). Dynamic DNS can also be arranged, but it is not necessary for HTTP(S) as the traffic goes through a reverse tunnel
- Management of own subdomains is moved from the registrar to cloudflare
- Configuration of port forwarding on the router (port forwarding to IP, assignment of IP via DHCP to a specific machine based on MAC)
- Nginx Proxy manager (NPM), which has practically the same configuration as cloudflare tunnels
- Creation and renewal of HTTPS certificates (Let’s Encrypt) at NPM
- Opening the port in the firewall, which might be needed on some Linux distributions.
Other benefits
- Simpler and centralized configuration
- The server’s IP address (home router) remains hidden, browser traffic goes to cloudflare domains
- Content caching
- SSH access via the web in case of emergency
Disadvantages
- Necessity to have your own domain and paying annual fee
- Cloudflare does not offer free detailed access statistics, they are not even divided by target domains
- An intermediary to whom you potentially give access to the internal network and must trust and depend on it -> a single point of failure
- Mandatory payment of 0 USD by credit card (this is not a joke)
- Limited file upload size to 100MB
- Changing terms of use, for instance Limitation on Serving Non-HTML Content probably disappeared
- It probably can’t replace VPN (but everything is not explored)
- For NextCloud, local access may be useful. For SSH, direct access is useful.
Configuration before Cloudflare
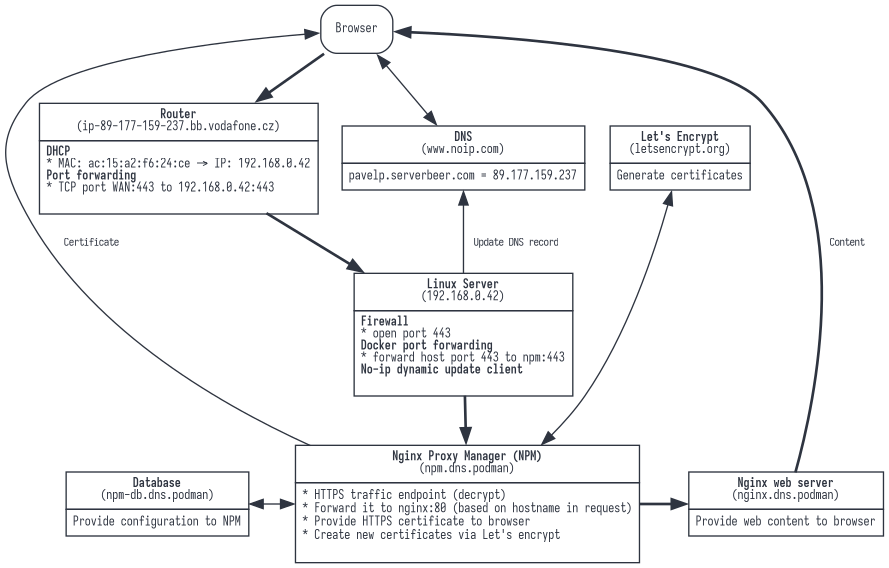
- DNS:
- Domain registration (optional, can be a second-level domain via no-ip.com)
- If the IP address changes, additionally we need dynamic DNS (for example no-ip.com, but it only supports three domains and not a first-level domain, requires monthly renewal)
- Router:
- Forwarding the external port (https/443) to a certain PC. This means setting a fixed address for the PC based on the MAC address in DHCP and setting a rule for redirection.
- Server:
- With docker/podman, we want to redirect the host’s port 443 to the container’s port 443 with Nginx Proxy Manager
- In the Nginx Proxy Manager, we must generate and assign an HTTPs certificate for each subdomain
- In the Nginx Proxy Manager, we need to configure based on the domain that redirection to the respective container should occur (TODO: rephrase)
- For some services (Nextcloud) may need to set up http->https rewrite
Configuration with Clouflare
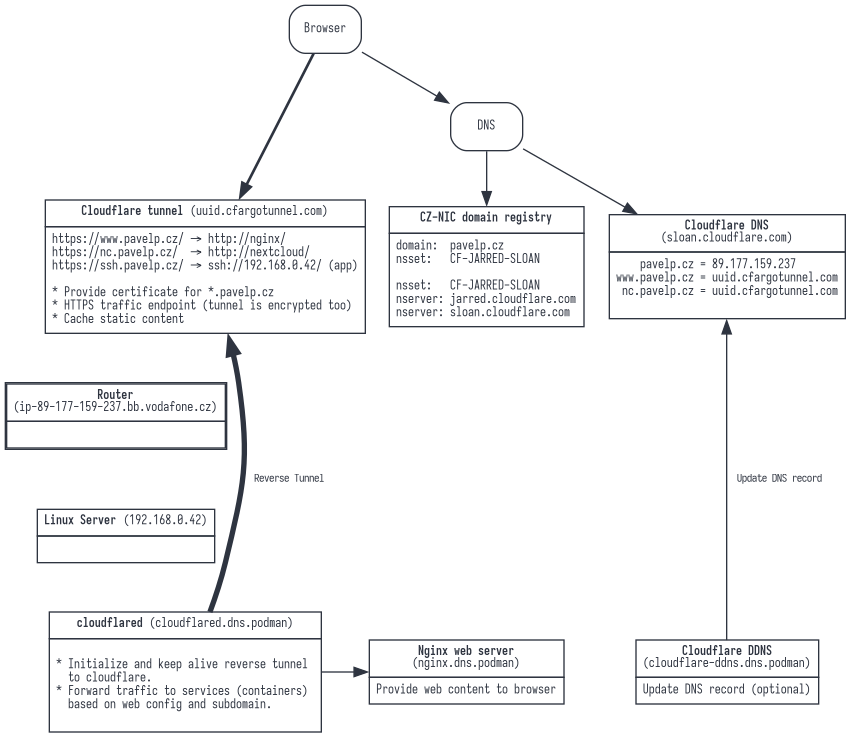

- DNS
- Domain registration is unavoidable
- We manage the domain at the registrar only by setting the NS records to Cloudflare.
- Cloudflare maintains the A, AAAA and CNAME records for us
- IP address change and dynamic DNS may not concern us (but may be useful for SSH)
- Cloudflare can provide dynamic DNS.
- Tunnels
- Tunnels are configured virtually the same way as Nginx Proxy Manager. DNS records are created automatically, as well as HTTPS certificates
- Router
- Does not require any configuration for HTTPS (but it may be useful to redirect SSH)
- Server
- We replaced NPM with Cloudflare which has web based configuration
- The cloudflared service runs in a container. It opens a reverse tunnel to the Cloudflare, and redirects traffic for each subdomain.
- A script to get the IP address in case we don’t have dynamic DNS
1
2
3
4
5
$ cat myip.php
<?php
$ip = shell_exec("curl -s ifconfig.me/ip");
echo "Public IP is: " . $ip;
?>
Configuration details
First steps are
- Purchase your own domain
- Sign-up at Cloudflare
- Add a new site (purchased domain)
- You will need to replace nameserver (NS) record of your domain with Cloudflare’s, which you will find in the Cloudflare dashboard. This operation may take hours or days.
I suspect that during the following steps it is necessary to pay a zero amount by credit card, possibly to enforce the loss of anonymity. In the main Cloudflare menu (not the one for a specific domain), we go to the Zero trust –> Access –> Tunnels section and add a new tunnel. Here it is named, for example, Fedora. In the second step “Configure Fedora”, it provides a long token and command line for Windows or docker.
We copy the token into the file ~/docker/.env as the line
1
CF_TOKEN=eyJh....
And in ~/docker/docker-compose.yml, which starts with
1
2
version: "3.5"
services:
we add
1
2
3
4
5
6
7
8
9
10
11
12
  # Cloudflared
  # https://hub.docker.com/r/cloudflare/cloudflared
  # https://developers.cloudflare.com/cloudflare-one/connections/connect-apps/install-and-setup/tunnel-guide/local/tunnel-useful-commands/
  # https://github.com/Erisa/cloudflared-docker/tree/main
  cloudflared:
    container_name: cloudflared
    image: docker.io/cloudflare/cloudflared:latest
    # image erisamoe/cloudflared
    restart: unless-stopped
    environment:
      - TUNNEL_TOKEN=${CF_TOKEN}
    command: tunnel --no-autoupdate run
And we restart docker/podman-compose.
Further configuration is very similar to DNS and Nginx Proxy Manager configuration. If we happen to have the given subdomains in DNS, we must delete them, the tunnel will create them again.
We add (example)
| Subdomain | Domain | Path | Type | URL |
|---|---|---|---|---|
| nc | pavelp.cz | HTTP | nextcloud-app | |
| www | pavelp.cz | HTTP | nginx | |
| ssh | pavelp.cz | SSH | marten.local :22 |
This redirects https://nc.pavelp.cz/ to the nextcloud-app container on the HTTP port, https://www.pavelp.cz/ to the container named nginx. SSH is more complex, for that we create an SSH application in the Zero Trust –> Access –> Applications section and that makes SSH available over the web (https://ssh.pavelp.cz/) and redirects the output to a PC on the local network. Here it is possible to use a static IP, such as 192.168.0.164, but using name resolution via AVAHI deamon is even better.
For the web, this is enough. Configuration specific to Nextcloud is discussed in the future article Nextcloud Configuration
Dynamic DNS
However, not all services run only via Cloudflare (like SSH), so there is also a convenience of dynamic DNS update. This is done by another container.
We obtain the API token on the domain management page (overview, on the right Get New API Token) and then we give it a name, for example, cloudflare-ddns and permissions for all zones (or selected domain)
| Zone | Zone Settings | Read |
| Zone | Zone | Read |
| Zone | DNS | Edit |
Now we edit our .env (definition of CF_API_TOKEN) and docker-compose.yml files.
1
2
3
4
5
6
7
8
9
10
11
12
  # https://github.com/oznu/docker-cloudflare-ddns
  cloudflare-ddns:
    container_name: cloudflare-ddns
    image: docker.io/favonia/cloudflare-ddns:latest
    restart: unless-stopped
    environment:
      - PUID=1000
      - PGID=100
      - CF_API_TOKEN=${CF_API_TOKEN}
      - DOMAINS=pavelp.cz
      - PROXIED=false
      - IP6_PROVIDER=none
With this, our DNS record for pavelp.cz is automatically updated when the public IP address of the router changes.
Bonus chapter: update of podman containers
1
2
3
4
5
6
7
8
9
10
11
12
$ cat ~/bin/podman-images-update.sh

#!/usr/bin/dash

# This script updates podman images and removes old ones
# PavelP, 2023-06-02

cd ~/docker
systemctl --user stop podman-compose.service
podman-compose pull
podman image prune --force
systemctl --user start podman-compose.service
Summary
I hope this post has helped you better understand the possibilities and benefits of using Cloudflare services for dynamic DNS and tunnels. While it may require some work on configuration and adaptation to your environment, the benefits in terms of reducing complexity, increasing security, and simplifying management may be worth it.
Although there are also some disadvantages, such as potential distrust in third-party providers or the possibility of changing terms of use, these factors need to be considered and decide whether the benefits outweigh these risks for you.
Thank you for reading.